This builds on the basic stuff described in http://coffeenavigated.net/roasting-coffee/
On this page I have collected examples of how to control the roast on the Bullet R1 roaster and look at the bean temperature curves from different roasts. Details in the roast process of a batch are called the Roast profile.
NOTICE: You can not run the same profiles on your Bullet and get the exact same results as showed here. So many factors influence: your local power supply, weather condition, the beans and so on.
So, this is only for inspiration. You got to try out for your self and find what works in your set-up.
News: Aillio has released a Infra-Red bean probe (IBTS) in 2019
It reads the temperature on the surface of the beans – in stead of the conventional contact-metal-probes. This makes different readings and different graphs = so do not compare directly.
See profiles at Aillio’s forum – go to Roast World.
Roast World
Aillio has a forum to talk about roast profiles. Go to Roast World.


.
.
.
CONTENT
My point is not to promote one way of roasting but to give you “a map” of different ways of doing it – to give inspiration. You have to try out for your self: what works in your setting, with your beans and to your taste.
Reading the Bullet Roasting profile graphs
A start profile
Difference in first and second batch
John-Paul McCarthy’s strategy
Bob Werby; two updates, he started roasting without computer
Roasting to start of 2nd crack – by Peter van Wijk
Roasting into 2nd Crack – by Davin Gegolick
Roasting 1 kilo for espresso – by John Plato
500 grams light roast, John Francis
Control points during the roast , Therese
Good tasting coffee with the same bean
Working on a nice declining ROR curve
– Kaffetårnet, Denmark
– Jed, USA
Roasting small batches (like 100 grams), by Klaus
Repeating a roast – Playback
Reading the Bullet Roasting profile graphs
The straight blue curve is the bean temperature (BT) measurement.
The jumping blue curve is ROR = Rate Of Rise – thats the rise in degrees of the bean temperature probe per minute. Its calculated during the roast. Typical peaking around 2-3 minutes.
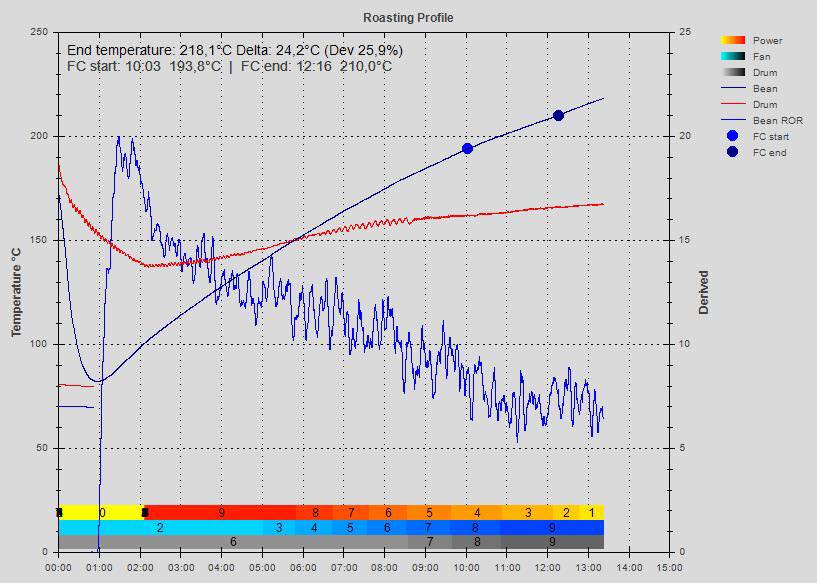
Forget about the red curve. The IR sensor to measure Drum Temperature works best when there is no beans in the drum. The purpose is only in the preheat phase.
At the bottom you can see a red/orange/yellow line – thats the power setting during the roast. The blue line is fan setting.
Remember that bean probes do not measure alike. Some get first crack (FC) start around 170 C, others around 197 C (also depends on batch size). This is due to technical differences in the probes. So look out for this when you compare with your own roaster.
A suggestion for a start profile
Here I will recommend a simple start profile for new users of the Bullet. This is a place to start. Then you can modify from there. How settings play out depends on you weather, power supply, beans and more. So you have to try out for yourself in your own setting.
Preheat temperature – depending on batch size
400 grams use 170°C
500 grams use 175°C
600 grams use 180°C
7-800 grams use 190°C
1000 grams use 195-200°C
Use power P6-p9 depending on batch size. And start fan on F2.
Look at the color change of the beans. Note the time for the first sign of light brown.
If the point of yellow/ the first sign of brown starts around 3 minutes it is a fast roast -> that might be good for a light roast of a hard bean. But if you want it slower then use less heat.
If the point of yellow/ the first sign of brown starts around 5 minutes it’s a slower roast -> might be just fine for a lower density beans, like brazil. But if you want a faster roast use more heat to begin with.
If the point of yellow/ the first sign of brown starts around 10 minutes I would think it was too slow. But taste for yourself.
For a lighter roast: At yellowing start to turn the power down; like one step every minute – ending at P2 before First Crack. If you do a 4-500 grams batch you can stay at fan F2. With larger batches turn it up to F3.
For a darker roast (getting to Second Crack) you need more energy going into First Crack. See Second crack profiles below.
Next step in your roast -> listen for First Crack. Some stop the roast counting time from First Crack start.
Sometimes it is difficult to hear First Crack (depends on bean type and energy into FC). Then you have to stop by color, by smell or by bean temperature.
If you choose to drop by Bean Temperature – be aware that the levels change with batch size. See below.
Difference in first and second batch
It is well known in coffee roasting that the first batch responds differently to the following batches on the same program / setting of power and fan.
This is due to the roaster getting heated up from running one batch. With the first batch the roaster will absorb some of the heat applied.
Here Davin from Canada have run batch 1 and 2 exactly alike: same bean, same batch size, same program – but resulting in different 1st crack start. The first batch reached FC at 8:16 minutes. The second batch at 7:51 min.

So if you want to repeat a roast profile using the Playback function from a previous roast – then bear in mind if it’s the first batch or a following.
Use extra heat for a first batch to compensate.
Steffen Lav has this strategy for the first batch, when he do a playback of a previous roast:
“First observe if the red DT curves are on top of each other. Then when the roast is going: if Turning Point (TP) is the same – if not increase or decrease heat immediately to compensate. If TP is the same it is normally a matter of compensating with more or less airflow – if that doesn’t help then heat compensate. However, observe that heat will changes quite slowly to new P settings whereas airflow change BT quicker. So do not overcompensate with the P setting.”
Also see Repeating a roast profile.
Different batch size
When getting to know your roaster, it is a good idea to stick to a batch size. Because different batch sizes responds differently to heat and fan setting.
Also, the temperature reading (BT) is influenced by batch size: you can see that by noticing BT reading when First Crack sets in.
In general FC starts when the beans reaches somewhere around 200 C. But with small batch sizes on the Bullet, the bean probe can show 170 C.
Example: same bean different batch sizes
700 grams:

1000 grams – same bean:

First crack comes higher at 1 kilo:
At 700 gram First Crack sets in at 191ºC.
At 1,000 grams it sets in at 196ºC.
In both cases airflow was around F4. The air moves from the back of the drum – through the beans – and affects the bean probe placed on the front (read about Bean probe sensitivity to airflow). The more hot beans the air travels through the warmer when hitting the bean probe.
At yellowing point the 700 grams batch lies higher:
At 700 gram at 149ºC.
At 1,000 grams at 141ºC.
Here the beans are not as hot than at First Crack. So they rather cool down the air than heat it.
John-Paul McCarthy’s strategy
John-Paul from Coalbox Coffee in Canada wrote this about his experience so far (July 2017):
As I have become more accustomed to the Bullet roaster and how the beans respond I’ve also begun honing my methodologies:
– 190 C preheat as standard for 800 grams
– Begin roast at P9, DS5 until yellow point
– Achieving consistent yellow point at 4 min
– At yellow point I increase drum speed each minute until FC to reduce tipping potential. And increase convective heat transfer.
– As I adjust drum speed I reduce power and increase fan speed toward FC. I’m still tweaking this to reduce the exothermic bump at FC. But I’m aiming for a P3 and F4 around FC point.
– Achieving consistent 7 min FC
– Achieving consistent 9 min roast duration
– 22-23% development (DTR)
Note: I’m still using the original chaff filter. So I’ll have to revisit my methods once the new filter it arrives.
Lately I’ve been regularly roasting two bean varieties:
– Fraijanes, Guatemala, SHB 1700+
– San Agustin Loxicha, Oaxaca, Mexico
800g batches are very consistent with the Guatemalan bean.
The Oaxaca beans were great initially but it became progressively more difficult to roast consistently from batch to batch at 800g. I couldn’t maintain a high ROR (above +20 C delta) through to yellowing. My yellow target is 4 min but I was getting 6 min with the 800g dose with roasts stretching to 12 min plus to Full City. It didn’t feel right.
Even at P9 it was as if the beans would suck all the heat out of the Bullet once my bean temp hit 100 C. This made if very difficult to reduce the exothermic spike that occurs during FC. The results tasted fine but I found that post-degassing aroma development was quite poor.
I seem to have hit a sweet spot when lowering the Oaxaca dose to 700g. The reason might be that the Oaxaca bean has a greater moisture content. Again it’s really a matter of continual analysis, calculated experimentation and determining what works best for a given bean variety.
Bob Werby, Virginia, USA
– with 2 updates
First: Roasting with out a connected computer, december 2016
Bob have roasted 100 kilo coffee in 5 months and found it all to have tasted fine.
He doesn’t have a computer connected to the Bullet.
Mostly he roast 1.000 grams batches. Otherwise it’s 700-800 grams. He aims at total roast time in the 12 minute range
With a preheat at 200°C the 1 kg beans get FC start just before 9 minutes.
With preheat at 170°C then FC starts as late as 13:30 min. His bean probe gets 1st crack (FC) at 187 – 199°C. End of 1st crack at 208-209°c
When to stop the roast
Bob stops the roast 20-40 seconds after 1st crack has ended, which with his bean probe is around 212-214°C. If he is unsure when FC did end, he stops at 2:30 after FC start.
He says: “There is a little bit of subjectivity in calling end of FC. My rule is that once I get a 3 second pause between cracks, I call it the end. Otherwise a few weird beans could cause the end of first crack to go on forever. Then I wait 20-30 seconds before dropping.”
Update july 2017 Roasting with a computer
We all modify our way of roasting along the way. Here an update from Bob Werby:
Earlier I did a P9/F2/D3 run from start to finish only reducing power at the start of first crack while running 1000 to 1020 gram batches.
Now I know that D3 is too low for drum speed. I liked that setup because the milestones – Temperature at the Start of First Crack, End of First crack, and drop temperatures matched what I was used to from my previous roaster.
In retrospect that really has little relevance. My roast times at 1000 grams and without computer control were lasting in the 15:00 to 17:00 minute range with first crack at 200°c to 202°c in 14:00 to 15:00 minutes while ending at 30 seconds after the end of first crack was about 208-211°C.
With computer
After transitioning to using a laptop to monitor the roasts I realized that I was probably obtaining a roast development under 20%.
I experimented with ways to improve that but found that I could not push enough energy into the beans and maintain a decreasing ROR easily with the large 1000 gram batches.
I experimented with multiple runs at 900 grams, 850 grams, 800 grams and 750, 680 grams, 620 grams, and 600 grams and found that it was much easier to to get a declining ROR, a 10:30 total roast time and a 22-25% development with 600-700 gram batches.
New strategy
My new protocol is P8/D8/F1 to start, then P7/F2 at dry, then F3 at 160°c and stay there until drop.
My first crack times are now in the 7:30-8:00 range @ 178°c-180°c
with end of first crack at 10 minutes and 190-194°c.
Drop is at 10:30 at 192-195°c.
In retrospect I believe I am producing better roasts and much more easily reproduceable ones under computer monitoring than I was before.
I also feel that the long period of roasting without a computer gave me an opportunity to get a really good grounding in the smells, sounds, and visuals of the roaster without being a slave to the electronics. I would not place too much faith in my probe temperatures as I did replace my probe during this time.
Also as you may recall, I do not significantly use temperatuers to roast. I do it by start of first crack and time of end of first crack dropping at 30 seconds after the end of first crack to obtain a City+ roast.
All the people the who routinely have had my coffee both before and after computer assistance still comment that they prefer my coffee to others. The feedback was extremely positive before and it is extremly positive now. I guess that is a testimony to the ability of the Bullet to produce great results within a very wide range of parameters. For one thing, I have never burnt a roast under either method – manual or computer. I also believe the 30 seconds + or – after end of first crack is a pretty foolproof system for getting reliable results. Another thing I must add is that I only roast very high quality (and more costly) beans with high ratings. On the few occassion where I have roasted bargain beans, I have had poor results.
Update october 2017
– John Francis calls this the “Werby protocol”
Bob Werby writes:
My new normal roast is the following for high altitude beans which is all I roast:
700 grams is normal charge amount;
Preheat either 195°C or 200°C;
P9/F1/D8 to start;
P8 at 150°C (my dry point);
P7/F2 at 160°C;
F3 at 170°C;
F4 at 175°C;
then P8 from 180°C to drop.
I have also run some while keeping P9 unitl 160°C and then going to P7/F2.
After I upgraded my 110volt socket to a full 20 amp service I found an improvement in voltage so that I could roast even 1000 gram charges under 12 minutes total. For that I have used:
Preheat 200°C;
P9/F1/D8 untill 160°C (skipping any change at 150°C dry) when I go to P8/F2;
then at 170°C I go to F3;
then at 175°C I go to P7/F4,
and at 180°C go to P6 – until drop at about 10 minutes total.
Roasting 1000 grams of Kenya gave FC start at 8:15 min. FC end at 10:40. And then drop at 11:15 min.
The exact same settings worked differently on different beans and required no changes on my part. I used the exact same settings for 1000 gram batches of Ethiopian beans on the same day and first crack started a minute+ later.
I do not think I will roast less than 700 grams ever again as the roast moves too quickly for me.”

Roasting to start of 2nd crack, Peter van Wijk
Peter van Wijk writes:
I usually roast up to 2 crack. I like the chocolat and nutty tastes.
I find it difficult to get a nice declining ROR all up to 2crack. Delevopment % is always between 30 and 40%.
Strange thing is, almost all profiles give a good taste.
This roast is 700 grams of Cuba, preheated to 185C:
Daryl commented:
“Same here. Prefer drifting right up to the edge of 2nd for my espressos. Always tastes good no matter how you get there.”
Peter van Wijk replys:
“I agree. Some roasts that have a bad looking profile, like having a little crash and then a raising ROR, that I expected to have to throw away, turned out to taste OK. Total roast time of around 14 minutes tasted usually better than 9 or 10 minutes roasts. Also letting the beans age for one or two weeks does a lot of good. Talking about espresso of course.”
Daryl answers:
“Yeah that’s my big mistake, not letting them rest long enough before drinking them.”
Roasting into 2nd crack
Davin Gegolick do this profile for customers who wants very dark roasts
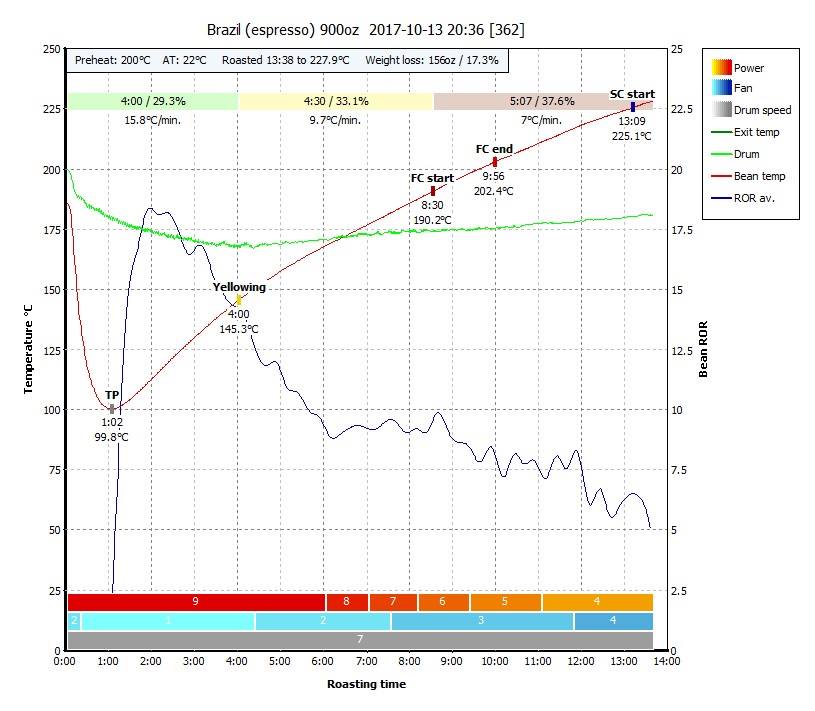
Roasting 1 kilo for espresso – John Platô
John Platô is very systematic and keep improving his profiles. This is the newest from March 2018
John first went with fanspeed F1 in the first half of the roast (see earlier profile below). His reason to keep it at the lowest airflow was to avoid “blowing out the heat”.
One day by accident he discovered that using F3 gave a faster time to Yellow point. He explored it several times and found it to give:
• more evenly distributed heat → more uniform color of the beans
• more clear flavour and sweeter taste
• less chaff
John Plato 2.0
1000g protocol. Mainly for espresso. Your roaster needs to be properly warmed up to be able to follow this curve. He recommends at least 30min of warm-up regardless of the “charge” call.
Charge DT 200ºC, BT 200ºC
Start D8 / P9 / F4
175ºC – P7
180ºC – P5 / F5
185ºC – F6
190ºC – P3 (keep an eye on the RoR!!)

Earlier profile (February 2018)
starting with low fansetting
JP’s 1Kg Protocol version 1.02
Charge DT200, BT200
D8 P9 F1
175 – P8 F3
180 – P7 F5
185 – P6
190 – P5 F6
195 – P4 F7
Stopped at DTR (development time ratio): 23-26%
 *please ignore the weigh loss figure – I forgot to update that before taking the screenshot.
500 grams light roast, John Francis
John writes in April 2018:
I like my coffee (as do my customers) bright, clean, and balanced. I do NOT roast dark, and I try to let the bean origin come thru in my roast.
After hundreds of roasts, this one is the current one I am running. A simple, clean, and easy to understand 500gr protocol. A few basic rules to follow:
– Don’t use an extension cord on your Bullet. Plug it directly into a 15-20amp circuit (120v) for optimal results.
– Charge your beans no less than 10-15ºC below your FC temp. (ex. Ethiopian that hits FC on your machine at 175º, charge at 160º BT. That is, wait for your machine to warm up enough that the BT probe is calling the temp “160º”. (If you charge at 200º BT, there are chances of scorching and tipping. This works with larger batches like what my friend John Platô runs at 1000-1200 grams.)
– Seek TP around 100ºC, or roughly 1 min.
– Seek MAI (browning, where NO green beans are left, around 4 mins or so)
– Seek City / City+ roasts around 195º finish temp with your RoR less than 5º
– Seek City + / Full-City Roasts around 200º-205º with your RoR less than 5º
Here is the protocol:
John’s 500 gram protocol (ver 0.85)
Charge P6/F2
150º (or Yellow): F3
FC (when time between cracks is less than 2-3 seconds): P5
190º-195º: F4 (to control declining RoR ONLY)
Notice: John lives at 7,200 ft (=2200 meters) and with 35% relative humidity. Read more under Changing Weather conditions.
 Even though it says Preheat 200 C, John writes: “I dont exactly use 200º to charge…i only use this as my pre-heat setting and charge when my BT hits around 160-165º.
Good tasting coffee with the same bean
Martin Kjeldsen and me (Therese) lives in different parts of Denmark, but we got the same bean – and the same roaster, the Bullet. The bean is from Uganda from Mount Elgon (on the border to Kenya). A real good bean.
We both have roasted the bean several times. The examples below is where we both were suprice of the taste. Remarkable good.
Martins was roasted 2 minutes from FC start to 192ºC. Mine was roasted 2:45 min and to 175ºC. But our bean probes do not measure alike. Notice the difference in FC start: Martin at 182ºC. Mine at 167ºC and 169ºC.
Martins roast, 500 grams, preheat 185ºC
Martin used it mainly for filter brew, but it also works as a lighter espresso.

Therese’s roast, 400 grams
 Taste: no burn flavour, no bitternes, nice round and good aroma.
So even though the ROR curve dont look alike for Martin and my roast profile, its still taste remarkably good.
I roasted it again 9 days later
First the the curves were very close. But after 5,5 minutes the ROR levels differed. Here both curves:

The higher ROR level at second batch gave an earlier FC; at 7 minutes … whereas the first was at 8:45 min.

This coffee didn’t taste good to me. It had bitterness and burned taste. And a weak aroma = boring coffee.
What could be causing this difference in taste ?
Alike elements
The development-% was around 24% for both (the time after FC related to total roast time). And weightloss was about the same: 14,3 and 14,5%
Development time (DT) was 2:44 minutes for the good one. The bad with more burned taste you would expect to be roasted longer, but no, its roasted a bit shorter: the DT was only 2:19 minutes.
3 possible explanations for the burnt taste
(1) A higher temperature rise in the bad one: 12°Celcius (and BT ended on 181°C) … where as the good one only rose 6-8°C (to end-BT at 175°C).
(2) When entering First Crack the bad one had a ROR around 10°C pr min. Whereas the good one was around 5. I have heard a recommandation around 5°C per minute – and not as high as 10°C when entering FC and for the rest of the roast.
(3) The american roaster Rob Hoos talks about the importance of the middle phase: from yellow point to FC start (see his book “Modulating the flavor profile of coffee“). He calls it the Maillard phase. In these two roasts the drying phase up untill yellow point are not that far apart: 4:00 and 3:45. But the lenght of this middle phase is 3 minutes for the bad one, and 5 minutes for the good one.
A roast consultant told me he prefers 3 minutes, so thats not criminal in itself. But maybe it suits this particular bean better with a slower roast; a longer middle phase and lower ROR levels during FC.
Working on a nice falling ROR curve
Read basics about the ROR curve here.
For many of the Bullet users it’s new to get a ROR curve. And the challenge is to control the heat and fan to get a nice declining ROR curve.
.
 October 2016, Kaffetårnet

Kaffetårnet is a small cafe in central Copenhagen, Denmark, with a Bullet roaster.
Here 750 grams of beans, preheat at 185 C. Settings:
→ first no power, P0 (thinking to avoid scorching of the beans)
→ when BT reaches 100 C, then P9
→ then stepping down: one step every 10 degrees rise in BT (bean temp) and stepping up Fan every 10 degrees.
FC was reached at 9:38 min.
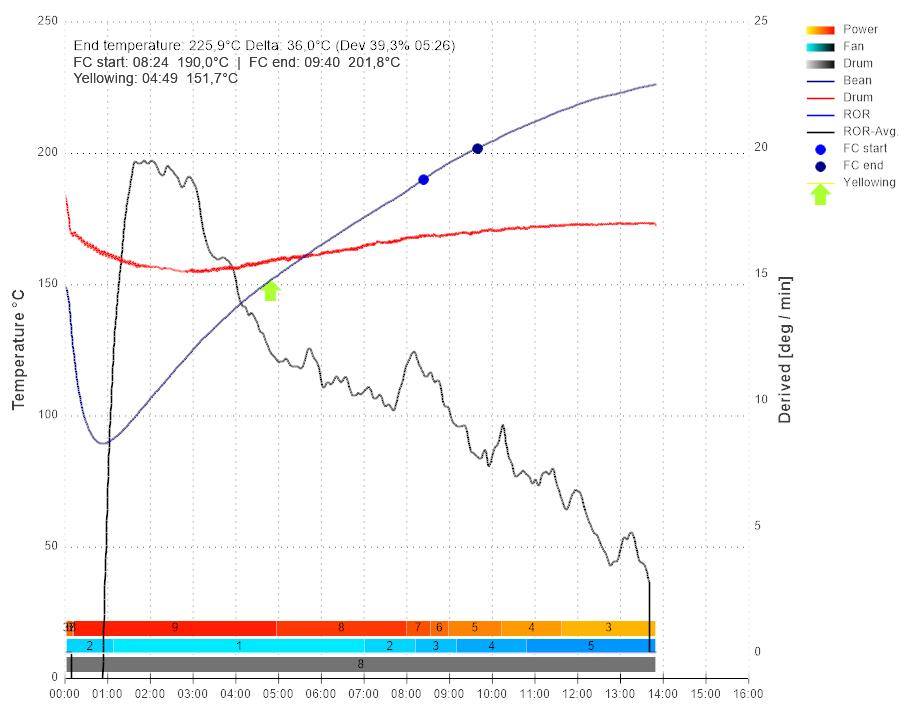
August 2016, Jed from USA
This roast was made by Jed:

Jed wanted to see how the ROR curve acted when nothing was ajusted during the roast. So power is set on P6 (see the orange barr in the buttom) and fan is set on F2 (see the blue barr). Batch size was 450 grams and preheat was 160 C (a bit low, for 450 grams I would use 175C).
The graph shows how ROR rises after 8 minutes. Too much. So you need to turne down the heat earlier on.
 In this second roast Jed reduced the heat: first steps down from P6 to P5 at 6,5 min and so on.
It helps. The ROR curve doesnt rise as much as before. But many prefer the ROR levels even lower around First crack.
You can work further on the heat adjustment. Like using Kaffe-Thomas technique with stepping down from 5 minutes, one step every one minute. And you can work with the fan setting. Excatly how much depends on the you batch size, bean type and roasting conditions (room temp and humidity) and … and ….
Larger batch size
Here is a roast from Eric with 1.000 grams Sumatra beans – again with no change in settings (apart for the first minute). Notice how the ROR level rise in the last part of the roast.
Roasting small batches
Aillio says minimum batch is 350 grams to have the right BT measurement. If smaller batch the BT probe will not be sufficiently covered. But you can still roast smaller batches. Just ignore the BT reading.
Klaus investigated this with 100 grams batches to do sample roast. He preheated to 140 C.
→ Started off at P5, F2 and d6.
→ At 3:30 minutes lowered power to P4. He got yellowing around 4:30.
→ At 5:30 lowering to P3 … and even later lowering to P2
Klaus roasted 8 batches this way and got a FC start between 7:30 and 9 minutes.
His point with the 8 batches in a row was to explore the development time. The first was roasted 50 seconds from First Crack start. The next 1:10 minute. And so forth jumping 20 seconds all the way up to 3:10 minutes:

How did they taste ? Klaus reports: If you seek a light roasted coffee with a lot of fruity notes the roast with DT around 01:10 minute was the best. Better aroma than the 50 sec and the 1:30. For a darker roasted coffee with more body and chocolaty notes the one wiht DT around 02.30 min was good.
Diego Cano in Colombia
Diego Cano use the Bullet roaster to do a lot of sample roasting. He found that it works best in 250 grams batches.

Coffee tasting good despite the ROR curve looks
These coffee tasted great.
Despite the Development time ratio was 10,8% and not between 20 and 25%.
And despite the ROR curve was not evenly declining. But still it was rising either.

Repeating a profile – Playback
In the software RoastTime, there is a Playback button when you choose a previous roast. This function can repeat the settings of Preheat, Power, Fan and drumspeed to a new roast. It doesn’t adjust according to BT during the roast. It simply repeats the shift in settings along the timeline = repeat the program.
How to:
→ In Off-mode press the “Playback” button, and the preheating will start
→ When the Bullet says “Charge” add the beans, and the program will run
→ You have to stop the roast manually (so have this planned, whether its time after FC start or at a certain temperature)
→ If you want to roast it longer than the playback profile, look out to turn up the heat – since it goes to zero when the original roast stopped.
→ When done, press “Stop Playback” (otherwise it will go on in the next roast).
You can override the program and manually do another setting. But the program will take over again at the next change of setting in the timeline.
Look at the ROR curve during the roast – and how it fit with the ROR curve of the profile you want to repeat. This tells you where the Bean Temperature is headed.
Note: it will make a difference whether its the first batch you roast or a following. Because when the roaster isn’t fully heated, it will absorb heat – this gives less heating of the beans. See graphs.
View 2 graphs together: use ctrl while picking the roasts from the list. Then they show up together.
 This was a roast from Martin that I tried to repeat with the same beans.
The BT curve is not exactly the same. Most likely due to small differences the BT probe. But the shape and ROR curve looks very alike.
.
.
Here Steffen from KaffeRist made 7 repeated roasts of the same bean – this was even on the same day, on the same roaster. But still small variations happens. Notice how first crack (FC) starts at different time and temperature.
