Taste preferences

When you get advice from other roasters, it’s important to know their taste preference.

What roast degree do they prefer ? Do they prefer clairity or a richer taste ? What kind of aromas ? How much acidity ? and so on.

itunes-logo1We do not like the same things in coffee. But also; we don’t notice the same things. So much is going on in the taste of coffee – so we can easily get different experiences from the same coffee.

Some people immediately notice bitterness. If the coffee has any bitterness they don’t like it. Maybe they like a light roast with clairity and fruit/flowers aromas. And dislike the burnt flavours.

Others only like coffee with solid burnt flavours, but really don’t pay attention to bitterness (smoking can reduce your ability to taste bitterness). This is in the darker roast range. These people find that the light roast thin and missing what good coffee should taste like.

espresso-henrik-therese-1

This is Henrik and me (Therese). He loves very dark roasted coffee – like in the Italian coffee tradition.

I find it tastes like a car workshop and awfully burnt. I don’t like it.


Read more about roast degree in the Coffee Landscape and Light versus Dark.

Normally I roast quite light (from 45 sec to 2 minutes from 1st crack start). But I am not at the lightest end of the scale. Coffee roasters like The Coffee Collective here in Denmark and Tim Wendelboe in Norway are a bit lighter than me – and they like more acidity.

la-cabra-2George Stavrinou from Australia has the same roaster as I (a Bullet R1). He asked me what I was trying to achieve with my roast profiles regarding to taste. This was my answer to him:

My taste preference in coffee
1) Avoiding bad taste
2) Balanced in the basic tastes. No strong acidity, bitterness or sweetness. A little is fine. It should be pleasant in the mouth.
3) A big aroma. In a light roast I get a certain kind of grand aroma that I can’t associate with a specific food/flower/whatever. I like deep aromas that stays as a pleasant aftertaste for a long time.
4) Taste the characteristics of the bean.

But since we don’t percieve taste the same way it is difficult to convey in text. Tasting coffee together is the only sure way to know.

Read more about using your taste sense in the Tasting section.


riste-farveskift-ida-kofod
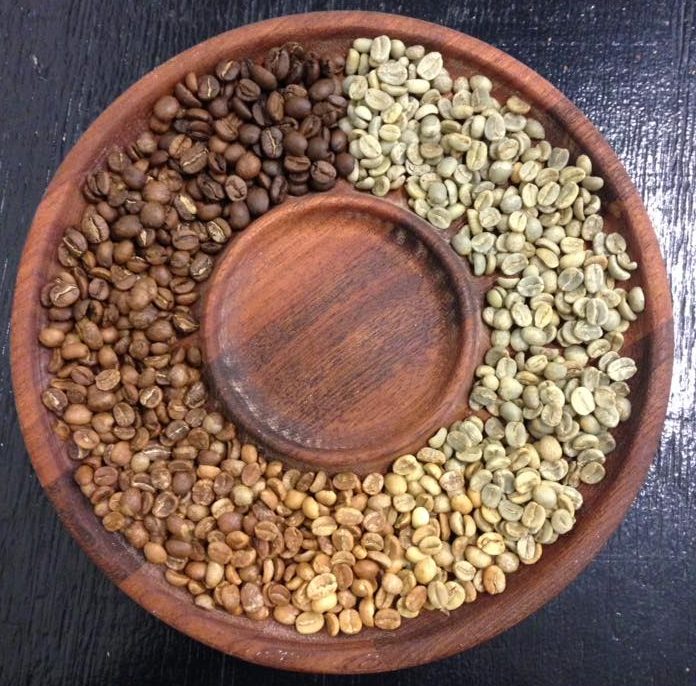
Photo by Ida Kofod, headroaster at Kontra Coffee.

She took out a sample each minut during a 14 minute roast – to show the color change.

Good and bad tasting of the same bean

If you really want to learn how different roasting profiles affect the taste – then roast 2 batches on the same day with only small differences in the profile. And then taste them side by side in the weeks afterwards.

Example

Here is an example of a good tasting and bad tasting coffee of the same bean. Much in the roast profile are alike, but not all the way. What causes the difference in taste ?

The bean is a washed arabica from Uganda. Fairly high grown at the Mount Elgon mountain on the border to Kenya.

The good tasting, 400 grams, by Therese

mt-elgon-great-2016-11-21-05-29-00Taste: no burn flavour, no bitternes, nice round and big aroma.

I roasted it again 9 days later. First the curves were very close. But after 5,5 minutes the ROR levels differed. Here both curves:

Two roast of the same bean Mt Elgon nov2016

The higher ROR level here gave an earlier FC; at 7 minutes in the second roast where as the first had 8:45 min.

mt-elgon-notgood-2016-11-30-06-39-48

This coffee didn’t taste good to me. It had bitterness and burned taste. And a weak aroma = boring coffee.


What could be causing this difference in taste ?

First the alike elements
The development-% was around 24% for both (the time after FC related to total roast time). And weightloss was about the same: 14,3 and 14,5%

Development time (DT) was 2:44 minutes for the good one. The bad with more burned taste you would expect to be roasted longer, but no, its roasted a bit shorter: the DT was only 2:19 minutes.


Possible explanations for the burnt taste
I cant say for sure why they tasted like they did – because several things was different. But here are some thoughts:

(1) A higher temperature rise in the bad one: 12°Celcius (and BT ended on 181°C) … where as the good one only rose 6-8°C (to end-BT at 175°C).

(2) When entering First Crack the bad one had a ROR around 10°C pr min. Whereas the good one was around 5. I have heard a recommandation around 5°C per minute – and not as high as 10°C when entering FC and for the rest of the roast.

(3) The american roaster Rob Hoos talks about the importance of the middle phase: from yellow point to FC start (see his book “Modulating the flavor profile of coffee“). He calls it the Maillard phase. In these two roasts the drying phase up untill yellow point are not that far apart: 4:00 and 3:45. But the lenght of this middle phase is 3 minutes for the bad one, and 5 minutes for the good one.

A roast consultant told me he prefers 3 minutes, so thats not criminal in itself. But maybe it suits this particular bean better with a slower roast; a longer middle phase and lower ROR levels during FC.

(4) They flavours go up and down during the roast – so maybe the bad one here would have been better if dropped earlier or later at than 2:19 minutes from FC start.


Martin Kjeldsen roast of the same bean

Martin Kjeldsen lives in different part of Denmark, but we got the same bean – and the same roaster, the Bullet. The bean is from Uganda from Mount Elgon (on the border to Kenya).

Martin have also roasted the bean several times. This is his best tasting batch:

500 grams, preheat 185°C

kjeldsen-mt-elgon-2min20sek-okt2016

Martins bacth was roasted 2 minutes from FC start to end-BT at 192°C. My good one was roasted 2:45 min and to BT 175°C. But our bean probes do not measure alike. Notice the difference in FC starts: Martin at 182°C. Mine at 167°C and 169°C.


Read more under Roast profiles.

Adjusting profile by control points

beans-trier-sh1It is not that easy to repeat a great roast you did some weeks ago, even though you use the exact same settings on the roaster. That is because the roast is affected by other things: how much the roaster is preheated, the batch size, and the surrounding air (see Changing weather).

The next thing is that the roasting process is slow to respond to changes so you have to make changes in advance. It’s like steering a ship.

So, it is a good idea to have control points along the way to see where the roast is headed and to do adjustments at an early stage … to better navigate the roast.

kompas kort kop

Here are the control points that I (Therese) use :

Turning point (see definition in Roasting Basics): use the temperature or time to see how fast the roast got off the ground. I note down the temperature. If it is lower than normal, the preaheating was too low. But then apply more heat.

115ºC: I note the time when the BT reach 115ºC. Again here I can see how fast the roast is going. If it is too fast, decrease the heat (P-setting).

From here on I prefer to use the physical changes: color change and the sound of First crack.  I make notes of the time, BT and ROR.

You can also keep using the BT reading. Just be aware that it is also affected by the airflow (fan setting). I initially used the BT reading as a navigation aid, but I found it more reliable to go by the color changes:

udsnit-regneark-analyseNote: this was with an older BT probe that had a lower temperature reading.

Looking at the ROR level tells you how fast the roast is going. If it is higher than I want at this stage, I have to turn the heat down. From around First Crack, you can also increase the airflow (fan setting) to the point where it cools.

I typically aim for a First Crack start between 7 and 9 minutes. But for some espresso roasts I like it to be later – but no later than 11 minutes. Read more under Taste preferences.

You got to find your own control points and choose your aims.

Also see
How Steffen repeated 7 roasts using the PlayBack function in the Bullet software but still needed to adjust along the way.