Roast degree makes a big difference for the taste of coffee. But other factors can make the coffee taste roasty and smokey.
New podcast episode out. Head roaster Ida Kofoed Lindhart from Kontra Coffee tell about changing roasting machine: From a 65-years old Probat to a brand-new 70 kg Loring.
When you roast the same bean on a regular basis and do the same roast profile – most of the time the taste turn out approximately the same. But sometimes it doesn’t anymore. That could be the beans getting older or changes in the environment.
In episode 13 in the podcast Coffee Roasting Navigated we talk about what to do when the taste change.
I interview Cristian Scigliano, barista and roaster at Andersen & Maillard in Copenhagen. And also talk to roasting consultant Michael de Renouard and roaster Kenneth Kastberg who build in pressure measurement in an old roaster.
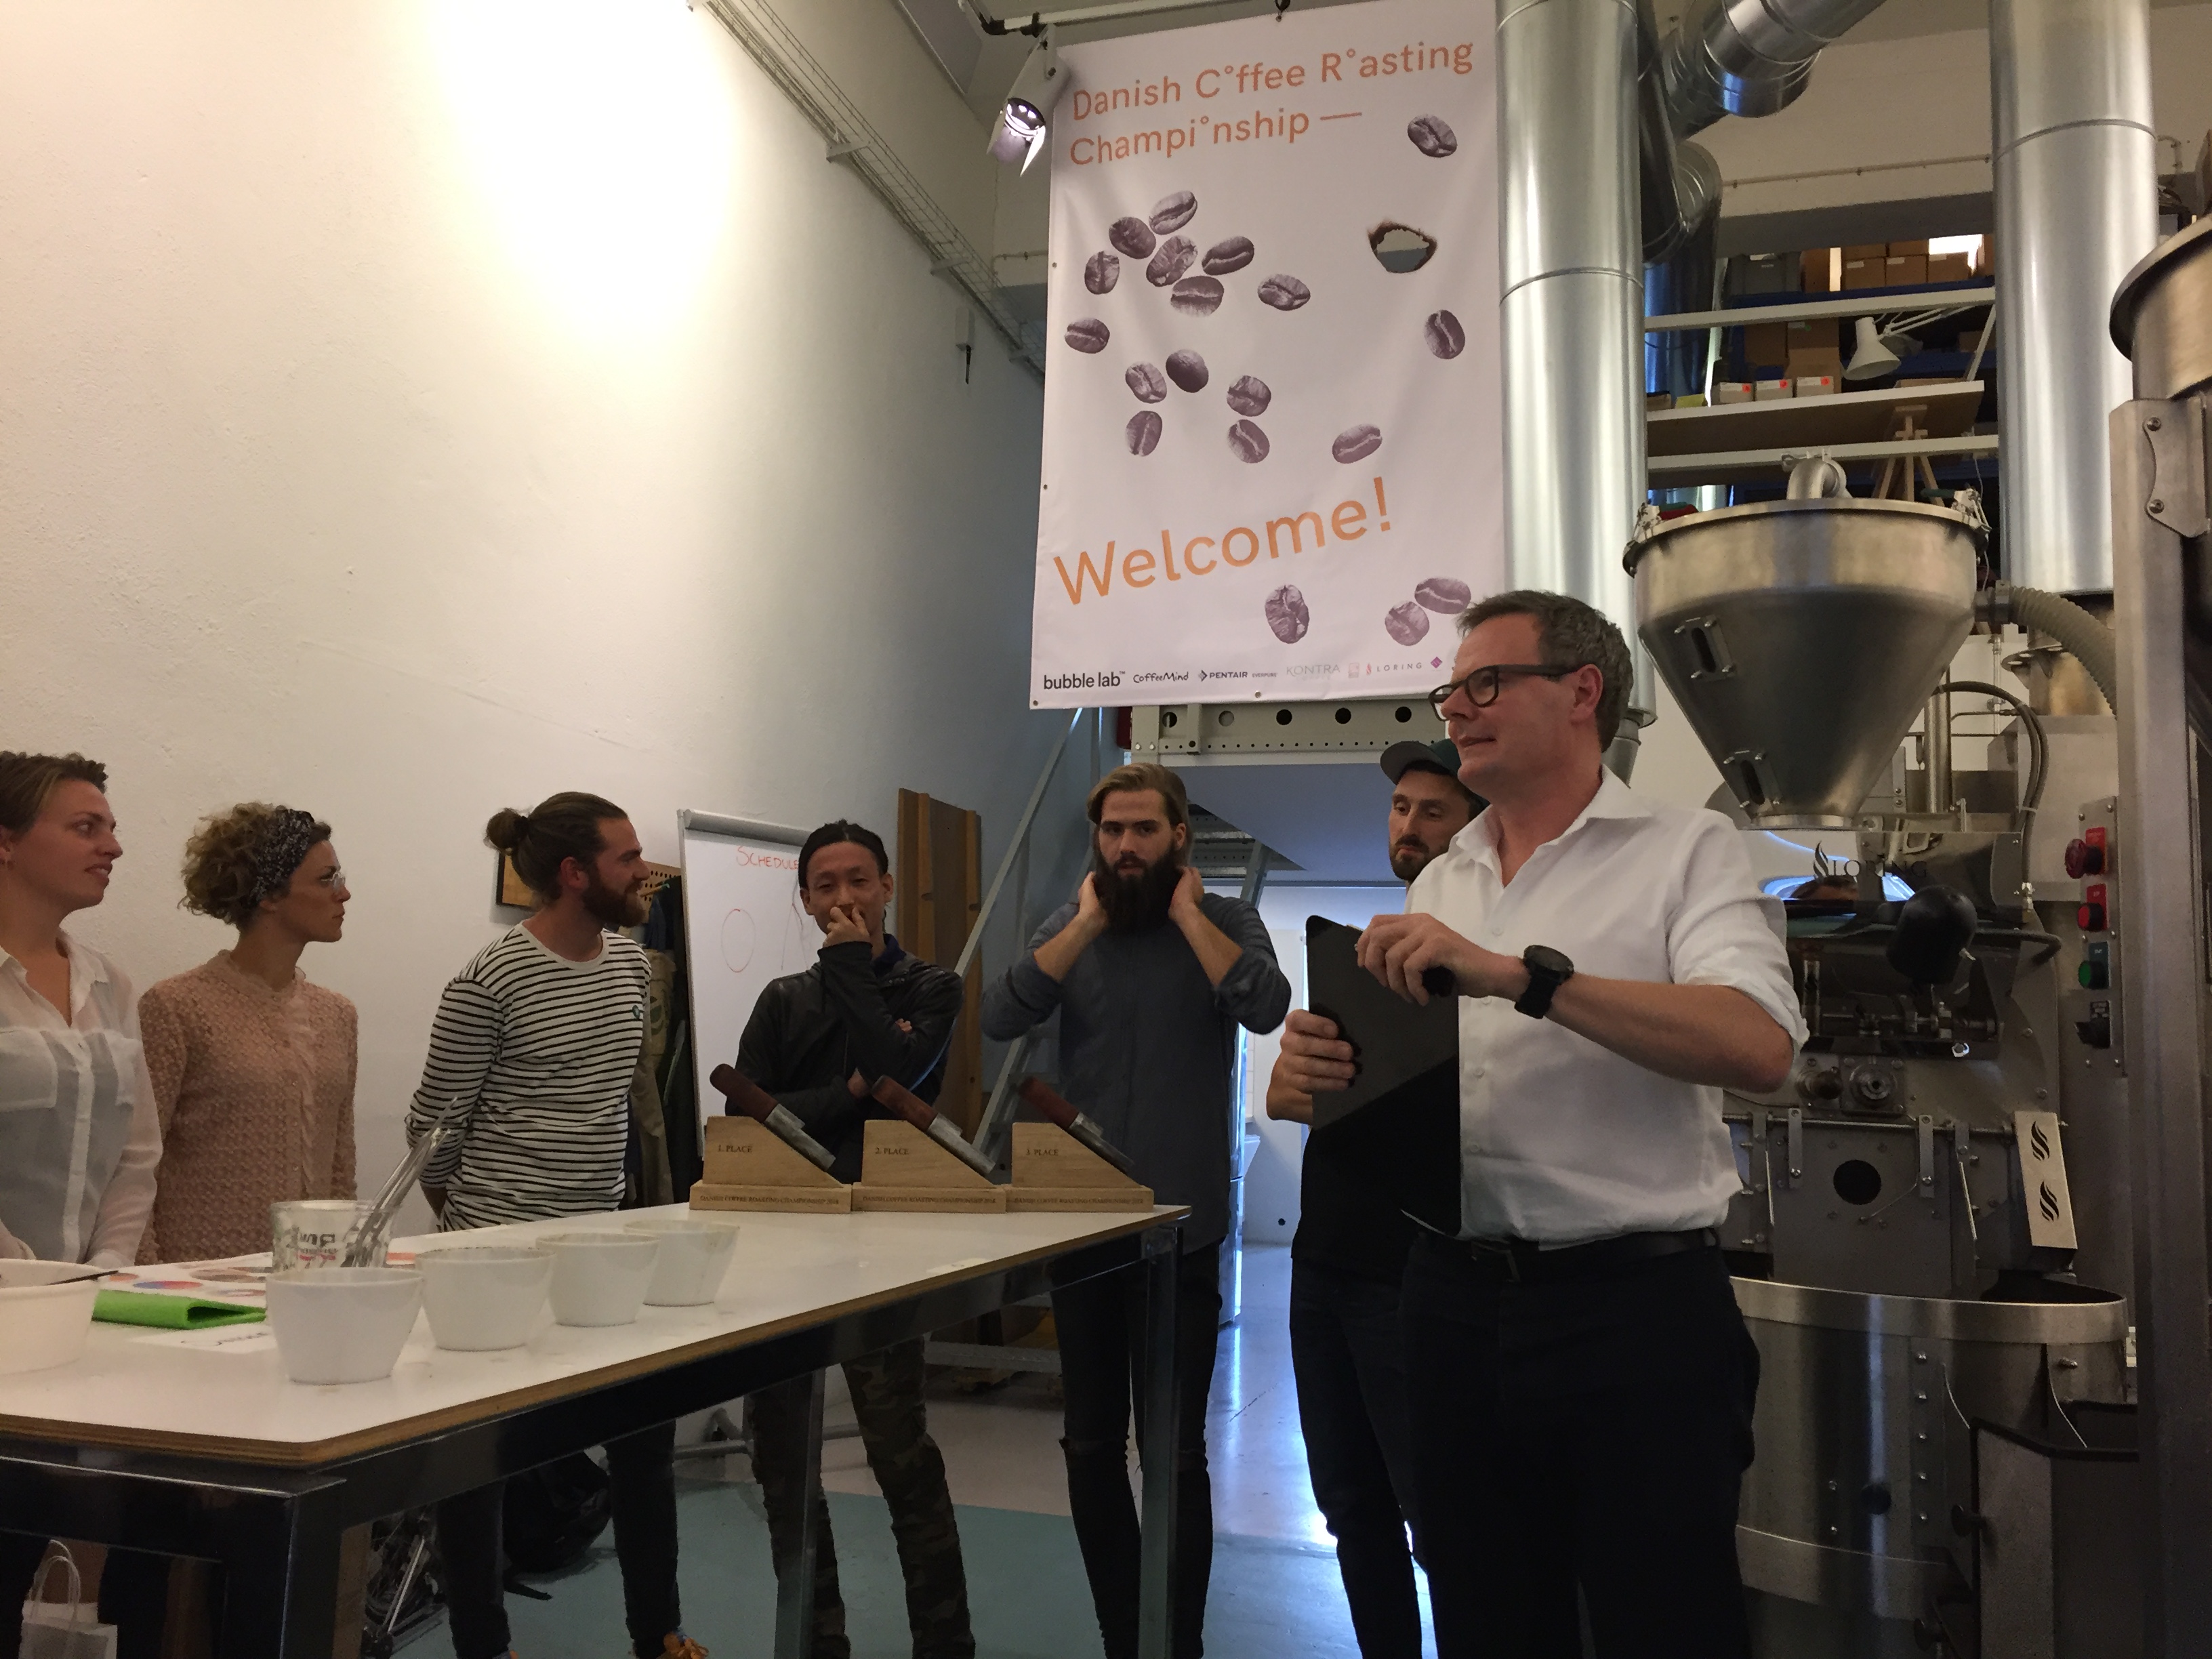
In 2017 I made interviews with five roasters at the Danish Coffee Roasting Championship here in Copenhagen (listen to podcast episode 6 and ep 5).
We just had the 2018 competition and I made a follow-up interview with Theo Maitre who won 1’st place in 2017 – and went to the World Championship in China.
How was the world championship in China ?
What have he explored in coffee roasting since last year ?
When you have roasted your coffee beans you need to cool your batch quickly – or it will harm the taste.
From roasting teachers I have learned the rule:
Cool the roast below 40°C in 4 minutes
But I have never explored what difference the speed of the cooling makes for taste. Mike Costaney did and he made a voice memo for my podcast. Listen at Sip 1: cooling the beans.
I find it fun the many ways coffee roasting is done. Here Dave Rumbler from Australia roasting coffee on open fire.
Photo by Eamon Waddington
He says: “I roast fresh every morning around 1-2 kg for my coffee/tatoo shop”.
He roast so differently from how I do it.
He roast untill 2nd crack is over ! That is extremely dark (I think it is called Spanish roast) – and close to fire in the beans.
He also have a much longer roast; he gets second crack after 33 minutes – when roasting 1,5 kilo.
My roast are often within 10 minutes and around the end of first crack.
He wrote in a coffee roasting forum and asked: “It’s just started to get cold here (winter is comming up in Australia) and my roast have gone from smooth creamy to a bit bitter. And had one roast go like a sour flavour.”
That made us talk about the lenght of the roast. Maybe it got too long. One hack is to roast smaller batches.
He tried with 1 kilo and found it tasted better.
It is normal that the weather affects the roast – and that you need to adjust the way you roast.
Ethiopean style
This reminds of the traditional way of roasting coffee in Ethiopia. They roast on open fire, very dark and right before brewing.
I tried it at an ethiopean restaurant. I expected it to be very bitter, since it was roasted way into Second Crack. But is wasn’t. From later experience it seems that the bitterness developpes during storage – as does the rancid taste from the coffee oils (after 10-14 days). Read more under Light versus Dark.
I did this video at the ethiopean restaurant here in Copenhagen, Denmark
Coffee roasting For a long time I have heard about how taking the trier out disturbs the settings of the roast: it changes the airflow because air comes in from the open hole.
But I hadn’t got a hands-on feeling of it … how much … So I did the trick with holding a flame from a lighter in front of it.
Very illustrative. Air is clearly being sucked into the roaster, see video IMG_1741
Next thing to consider: how is your roaster build ? This is the Bullet R1. The flow is driven by an opening right over the trier. Same place as the bean chute. This is in the front of the drum. Normally the air is coming from the back of the drum: so it goes through the beans and then up the channel next to the bean chute – driven by the fan in the back.
But when the trier is taken out and air comes in here in the front, less air will flow through the beans. So suddenly you get much less (if any?) airflow through your beans.
The Loring roaster (from 15 kilo and up) has a nice detail. When you take out the trier a little door closes from the inside. Exactly with the purpose to keep the intended airflow in the roasting chamber.
Geisha is a botanical variety of the arabica coffee and is priced markedly higher than other great specialty coffees. Geisha has a big reputation for it’s great taste. A few years ago it was still very rare. So few people had tasted them.
The reputation started with the coffee farm Esmeralda in Panama. They have been doing auctions since 2008. Almost every year the top lot achieves a higher price.
Of course, other coffee farmers saw these high prices and wanted to plant them as well. In the recent years a lot of Geishas from different countries have hit the marked.
That made me wonder:
How different are they ? Normally there is more to the taste of a coffee than the botanical variety.
And … how good are they ? How much is just hype ?
I had tasted the famous Esmeralda farm Geisha some years ago at The Coffee Collective here in Copenhagen, Denmark – and I did find it extraordinaire; very complex and dense in the taste. Impressive. But as prices was rising I was wondering about how overpriced they were.
How to do a comparison ?
When roasteries sell Geisha coffee it is often markedly more expensive than other coffee. Of course, since the green bean price is higher. Normally from a green bean company you can get samples. But rarely on the Geishas. If you want to participate in the Esmeralda farm auction you can buy samples for $ 300 ! Or that I heard some years ago.
My way of doing this is to ask around in the Danish coffee community if people want to join forces (money) and buy Geishas together for a cupping event.
They were game. Quickly we were 17. And some on the waiting list.
We bought coffees for more than € 400 !! The most expensive coffee tasting I have ever done.
Francesco Impallomeni invited us to do the cupping at Nordhavn Coffee Roasters, here in Copenhagen. Thanks for hosting ♥
Photo by Gitte
Picking Geishas for the cupping event
We limited ourselves to 12 different coffees. Too many coffees can be overwhelming. A pity that good coffees drown in a crowd.
We selected them to try different countries, different processing (washed/natural/honey) and different roasteries. John Lindgreen and Andreas did the research and picked the coffees.
I got hold of one Geisha in green beans, 1 kilo. This we wanted to explore in different roasts.
We got 4 different Panama Geisha. At first no one had Geisha from the famous Esmeralda farm for sale. But when The Coffee Collective heard about our event they donated us 15 grams of Esmeralda. Just enough for one cupping cup.
Coffee farmers in Costa Rica had been quick to plant Geisha coffee. So much Geisha comes from there. We got hold of 5 Geishas from Costa Rica; different processing (red and white honey, washed and semi washed) and different farms.
Then we had 4 other countries with one coffee from each: Colombia, Bolivia, Honduras and Ethiopia.
Regarding the Ethiopian: it wasn’t a Geisha like the others. We expect all the other coffees to be the same botanical variety – gotten from Panama. But the Geisha variety grown in Panama for the past 100 years was imported from the Gesha area in Ethiopia. The same area where the Gesha Village coffee farm is situated today. Their coffee trees are from the local area. So the two kinds probably have similarities but may also have differences in the DNA.
The last round was one bean from Costa Rica; Santa Teresa, white honey. But in four different roasts. I had gotten hold of 1 kilo of green beans and had roasted 200 grams at a time.
I had heard that Geisha is only special in a very light roast. If you roast it darker it will be more ordinary. I had no idea exactly how far that was. But started by giving it 1 minute from first crack (=Development time =DT). I found it got dark very quickly. I tasted it 5 days later and found it a bit lighter. So I ventured shorter with the next roast: 45 seconds DT. Again tasted 4-5 days later. It could bear shorter. So the next batch I did 35 seconds. It seemed thinner. So I wouldn’t go shorter.
On the other hand, I wanted to explore “how to ruin a Geisha”. How little longer would it need to get boring ? My guess was 1:30 minutes DT.
The water
Here in Denmark we have great water from the tap. Very clean. It is just very hard = high in Calcium Carbonate (you can see the formation of lime scale in your kettle). That mutes many tastes in coffee. Especially in light roasted coffee.
So if you are enthusiastic about coffee you use filtered or spring water for coffee brewing. But that can be done in many ways.
So a few days before the cupping event; we tested 4 kinds of filtered water. We tested it on the Bolivia Geisha from The Coffee Collective. One of the waters was the one used for the espresso machine. That was the worst of the 4 waters. It made the coffee taste boring. The aroma of the coffee came out in the 3 other cups, but here it was muted.
With the two best waters one had a higher Calcium content – and that gave a little dryness to the coffee. The other had higher Magnesium and made the coffee taste the best.
This water had these specifications (in CaCO3 equivalents):
Magnesium 53 ppm
Calcium 55 ppm
HCO3- 54 ppm
So the ratio the KH to GH ratio was 1:2.
KH = Carbonate hardness
GH = General hardness (Magnesium plus Calcium)
The bottled water we started out with (Denice) had 117 ppm HCO3- But we lowered it by adding 7,2 mg citric acid per liter.
Such small amounts are difficult to do precise on a scale. So Andreas made a concentrated citric acid solution – and used a syringe to get the right amount for each 2 liter bottle:
Note: We didn’t test all kinds of water. Just the ones that would be operational for us to use in this cupping.
Grinding and dosage
When we tasted the water, we used a grinder in the roastery. But Andreas could remember that the Bolivia Geisha coffee tasted better with an EK43 grinder. Sweeter. Clearer aromas. So we brought a EK43.
Grind size: a bit finer than for drip coffee.
Dosage: 60 gram pr liter
We had 3 cups of each coffee because we were 17 people. We made 3 cupping spots with 5-6 people at each.
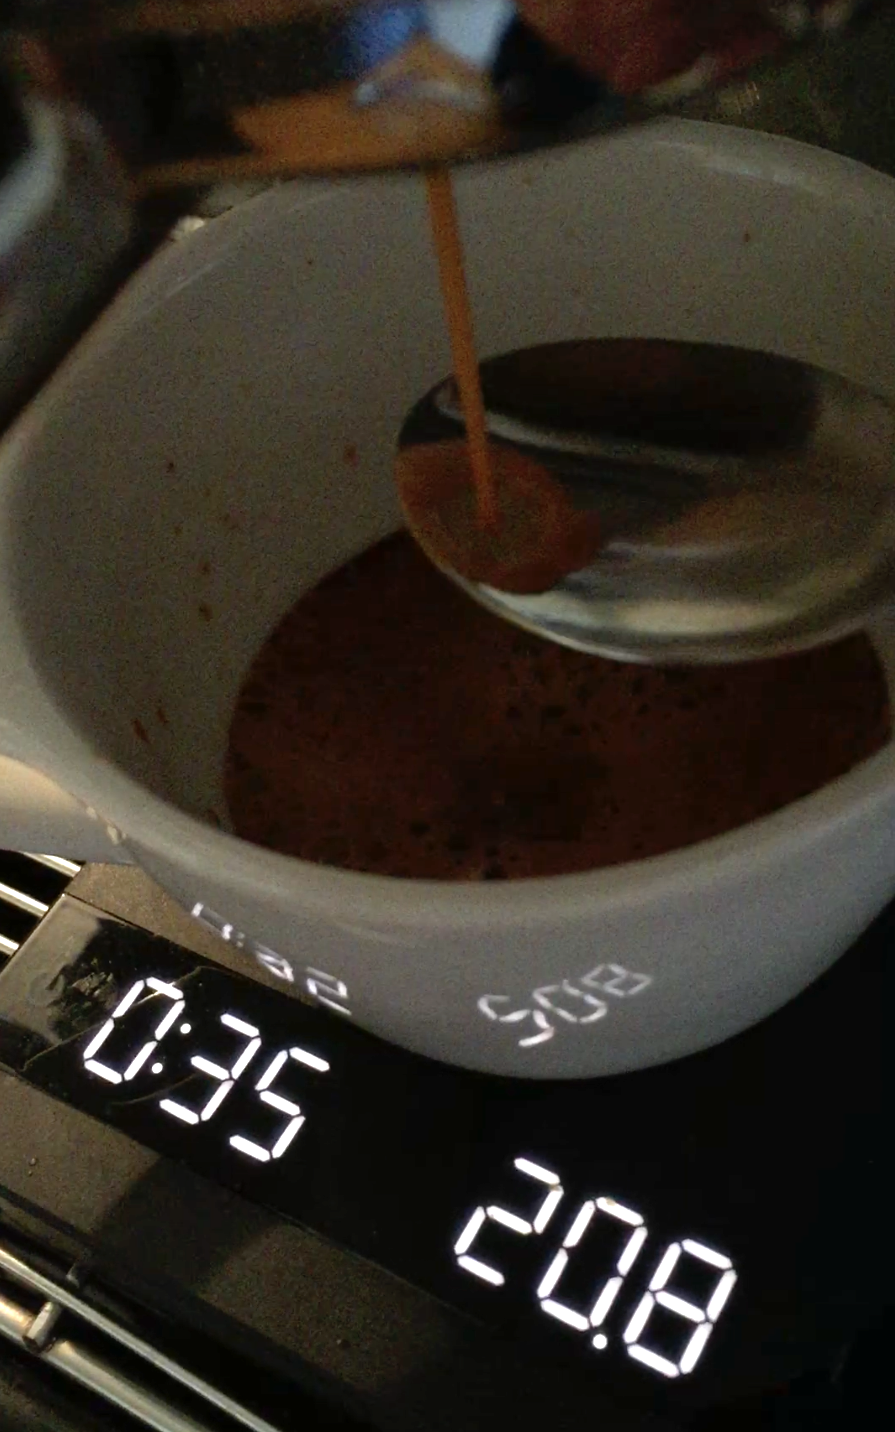
How did they taste?
First of all: you should always be careful not to judge a coffee from a single tasting. Different coffees are the best at different brewing techniques.
Here we opened the coffees on the day of the cupping. But some times a coffees get better a couple of days after opening – must be that a little oxygen does something good for taste at first.
But still it is useful to compare coffees like this – because differences stand out more clearly than when comparing out of memory.
The downside to having an all Geisha cupping is that the similarities won’t stand out. When I earlier have tasted Geishas, it has been the only one on a cupping table with other kinds of coffee. And each time the Geisha has stood out as something special: the taste was very “filled out”/ rich. And they had much sweetness.
We tasted the coffees four at the time to avoid overload. To have enough time to focus on each coffee as they cooled down. That gave 4 rounds:
Round 1 “4 countries”
We started with this round because we expected here would be the biggest difference.
No 1: Bolivia – Takesi – washed.
Roasted by The Coffee Collective, Denmark
No 2: Colombia – Finca Rosenda – Washed.
Roasted by Ditta Artigianale, Italy
No 3: Honduras – Caballero – Washed.
Roasted by Tim Wendelboe.
No 4: Ethiopia – Gesha Village – Natural.
Roasted by Gardelli, Italy
The Bolivian and Ethiopian stood out.
The Bolivian had a very deep smell. Tasted very fruity (raspberry and abricot), soft, sweet and tea like. When it cooled a nice acidity came out and it had a hint of Ethiopian bergamotte.
The Honduras reminded me of a washed Ethiopian coffee. A roaster, Kenneth, described it as bergamotte but a bit herbal – and it was missing floral notes.
Gitte had it as her favourite in this round – she described it as chocolate and vanilla . Andreas said hazelnuts and honey melon.
The Colombia was weaker in the aroma than the others – and had bitterness. I would tend to think it was roasted too dark. When it was warm I found some caramel in the taste. Right after I found they also wrote that on the bag. It also said Tangerine. I found that as it had cooled down.
On week later a few of us tried it again in cupping. This time it was much better. I liked it.
The Ethiopean Gesha Village: Andreas and Francesco had it as their favorite of the whole cupping. It had a strong natural taste. To me it dominated it all and I didn’t find it interesting. It really divided people; they either really liked it or really didn’t. Very typical for naturals.
By the way; when the coffee had cooled all the way to room temperature the natural taste was more discreet/less pronounced – and I liked it better. Andreas liked it very much and as it cooled down he found: violets, honey and blackcurrant. Kenneth said; lime fruit.
Those who didn’t like it called it over-fermented or like olives.
By the way – the Ethiopian and Bolivian coffees had the highest cost per kilo of all the coffees.
Round 2 “Panama”
No 9: Panama – Ruiz family – Natural.
Roasted by Horsham Coffee Roaster, UK
No 10: Panama – Finca Hartmann – Washed.
Roasted by Ditta Artigianale, Italy
No 11. Panama – Finca Hartmann – Natural.
Roasted by Ditta Artigianale, Italy
No 12: Panama – Esmaralda – Natural.
Roasted by The Coffee Collective, Denmark
Even though 3 of these coffees were natural they didn’t have the strong natural aroma as the Ethiopian in round 1.
They were all very good. We agreed that this was the best round.
No 10 and 11 was from the same farm, Finca Hartmann – just different processing: washed and natural. We found the washed to have “classic Geisha taste”.
Kenneth noted no 10 as jasmin, green grapes, melon, coconut, nice sweetness and acidity. Funny enough he found the jasmin only when it was warm – where as the natural processed no 11 from the same farm, he first got the jasmin when it had cooled. No 11 he also found had plum and raisin. At a little strawberry jam at first – for him a typical sign of natural process.
John had the natural (no 11) as his favorite of the whole cupping. Gitte had no 10 as her second favorit of the whole cupping.
No 9 from the Ruiz family: here some said it was roasty. As it cooled down it became my favorite of the whole cupping. It had some very seductive aromas. Kenneth got some unpleasant bitterness when it was warm. But as it cooled it disappeared and he found it amazing – with warm spices (like cloves).
We cupped it a week later in both 60 and 50 grams per liter. It was the best in 50 g/l. This time the flavor was more funky and had a tast of heavy rum.
The Esmeralda: More than 10 people liked it the best. Roaster Ida Kofod from largest specialty roastery here in Denmark, Kontra Coffee said it was among her ALL TIME favorites coffees: “This coffee has everything! Totally balanced, sweet, acidic, bitter, heavy, thin, juicy, fruity, I could go on. A very complex and clean cup, I love it.”
Kenneth was also blown away: It stood out from the rest. So clear apple acidity. Great sweetness. So complex. So many fascinating aftertastes. Light years ahead of other good coffees. Perfectly roasted coffee. He felt overly stimulated here.
The funny thing was … when I first tasted it, I thought something was wrong. A defect bean or something. Because to me it had a bad taste, like vinegar/acetic acid. Andreas got the same. This just underlines how different we taste. Two of us have a receptor for some compound that the other 15 people didn’t have. But I had earlier tasted Esmeralda coffees were I was very impressed, so it might just be this particular coffee I had a problem with.
We concluded that Geishas grown in Panama are something special. And we think that the high auction prices at the Esmeralda farm are not pure hype.
Kenneth remarked that the Peterson family put a lot of work into making the coffee at the Esmeralda farm. So if you want to make great coffee there is no short cut in just planting a Geisha coffee.
After the cupping I talked to The Coffee Collective. They told me that this Esmeralda lot was the wildest tasting coffee they ever had. They had the same experience as us: Some did not like it – but most of them loved it and was in heaven. So they asked the Peterson family if they could reproduce that coffee; make the same taste next year. They said no. There had been some weird wheather conditions during the processing.They found the taste so different so the lot wasn’t a part of the auction.
By the way – The Coffee Collective also found vinegar in the taste (as Andreas and I).
Round 3 “Costa Rica”
No 5: Costa Rica – Doña Daisy Finca Don Pepe – Red Honey. Roasted by Has Bean, UK
No 6: Costa Rica – Finca El Potrero – white honey. Roasted by Has Bean, UK
No 7: Costa Rica – La Candelilla – washed. Roasted by Gardelli, Italy
No 8: Costa Rica – Montebrisas – Semi Washed. Roasted by Ditta Artigianale, Italy
We were a bit disappointed in this round. They were not as good as the Panamanian coffees. But that was also was also difficult to follow.
The first two from Has Bean we found too dark (but not as dark as Has Bean normally roasts, some remarked). Could have been interesting to see if they would have had more aroma at lower dosage. Maybe 50 grams per liter instead of the 60 we did here.
We tried that a week later. It was better in 50 g/l. More flavors came out. But to me it was still a bit too dark roasted.
Everybody found something was wrong with the La Candelilla coffee. It was hay like/grassy. One asked if it was an older crop. No, it was from 2017. The bag didn’t have a valve. So, the CO2 release made the bag a balloon (close to exploding).
I tried it several times in the following week hoping to crack the code for brewing it. But it was difficult.
Gitte had no 8 Montebrisas as her favorite in the whole cupping. When I tasted it again a week later I could agree with her. It had both the depht and a light aromas underlining the pleasant acidity.
Kenneth felt he didn’t give these Costa Ricas time enough. He was so blown away after the Panama round. His favorit in this round was no 8 Montebrisas. In general Costa Rica coffees are more delicate, he thinks: you have to work more on roast and the brewing.
By the way – the two Has Bean coffees had the lowest cost per kilo of all the coffees.
Round 4 “Different roasts of the same bean”
12. Costa Rica – Santa Teresa – DT 35 seconds
14. Costa Rica – Santa Teresa – DT 45 seconds
15. Costa Rica – Santa Teresa – DT 1 minute
16. Costa Rica – Santa Teresa – DT 1:30 minutes
People agreed all four roasts tasted very different . And that the aroma was different from the panamanian Geishas. It had notes of roasted hazelnuts and butter. It was very sweet but maybe too much.
People had different favorites among the first three. Almost equally distributed on the 35 secs, 45 secs and 1 minuts roasts.
Everybody agreed that the 1:30 minuts was too dark. Bitter, burnt and hardly any of the aroma. But again, the question was: would it be better at lower dosage ? We didn’t get around to that. But we did make an espresso with it. And it turned out good. Almost perfume like aroma.
Two persons at the cupping prefer some bitterness in their coffee. But even for them the DT 1:30 minuts was too much. They liked the 1 minute roast the best.
Some of the participants had high bitter sensitivity. Or rather; can taste types of bitterness most of us can’t. They found the DT 1 minute bitter. And they liked the 35 seconds the best. They found it had the highest sweetness. I too liked the 35 seconds the best.
To me who had roasted them and tasted along the way to plan the next roast … this coffee is the sweetest I have ever had. And it had a very distinct roasted hazelnut aroma (like in the Nez du Café aroma kit). I don’t think I have met such a powerful hazelnut aroma before.
Conclusions
Just because you buy crazy expensive Geisha beans doesn’t mean you get great coffee automatically. You must work for it.
Do Geishas planted in other places than Panama have the same taste ?
No. Other factors like climate and soil does influence the taste. They are not all floral. But they seem all to have much sweetness.
Processing of course also influence. But the naturals from Panama were among the best naturals we have tasted.
Is the pricing of Geishas hyped ?
We think so. You can get other great tasting coffees not quite as expensive. But the famous Esmeralda farm in Panama do a good job, so we don’t think their high auctions prices are pure hype. There is a reason they are still high despite the increasing supply of Geishas from other farms. In Kenneths opinion they are light years ahead in making good coffees.
But even though there is an element of hype in the market for Geisha, I don’t think the hype is that bad. It is a driving force for the marked of high quality coffees. The hype makes buyers pay more for coffee. And the high prices makes it worth while for the coffee farmers to strive to produce superb coffee.
What I have heard from others
A Danish guy visited a Geisha farm in Panama last year. He said they roasted Geisha only 20 seconds from First Crack.
A Danish coffee farmer in Mexico told me that Geisha grown lower than 1,500 meters is not interesting.
Norwegian roaster Tony Jacobsen writes about his experience with Geishas:
“We have had Geisha private reserve from Hacienda La Esmeralda and i have tried Geisha from Geisha Village, something from Ninety Plus, i have tried the geishas from Panama Varietals. And they are all unique in their way. Now we are actually importing a Peru Geisha, getting it by plane, hopefully next week. I remember Hacienda Esmeralda from 2007 Kaffa, it was a game changer. I love geishas, they are hard to roast as you mention. But if you get them right, they are the most amazing coffees from South America. Overpriced yes, but i guess it has its market. I like them clean, not naturals because of the botanically qualities as the sweetness – that i want to come from the bean and not the processing. But the floral notes are like catching butterflies in my mindset.”
Exploring Geisha coffees with The Coffee Collective
After this cupping I visited The Coffee Collective with my recorder and interviewed Samuli Marilla about the differences in Geisha coffees. The Coffee Collective have been roasting Geisha since 2009.
We had Geisha coffees from Guatamala, Costa Rica, Bolivia and Panama in green beans.
Tasting light roast for the first time is strange for many coffee drinkers because something is missing compared to the darker roasts.
But many coffee people loves it, because it has some great flavours that dark roasts don’t have. A good light roast have a nice sweetness and acidity – and no bitterness. But it is not easy to make it good.
Original Coffee (OC) is a coffee bar here in Copenhagen. They always have two kinds of roast for the espressomachine: a darker roast they present as “Traditional” and a lighter roast they present as “Modern”.
It’s a very good way to communicate the taste to a regular coffeee drinker. The Traditional is in the expected taste area. The Modern is different.
But light and dark roasted coffee are not only different in taste but also to work with. So if you treat a light roast like a dark it won’t taste good. And the other way around.
If you are curious to try there is a few things to know. Because they are different to work with. Below is a list with the differences. We also talk about this in Episode 8 in the podcast Coffee Roasting Navigated.
There is no common definition of when exactly a roast is light or dark. In the U.S.A. it is common to call it a light roast when stopped before the Second Crack, but still having completed First Crack. Here in Northern Europe that would be considered a medium roast. We call it a light roast when it’s stopped before the First Crack is over – or just around the end.
List of differences
Comparing dark coffee roasted to 2nd Crack versus light roasted stopped before First Crack is over or just around the end.
1. Roasting
Not all beans taste good in a light roast. High grown beans is a good place to start if you want to explore roasting light.
Not any light color roast taste good. You have to explore to find what roast profile suits the given bean.
2. Dosage
This is mainly for filter/drip and french press. Regarding espresso go to #7.
When you brew a light roast: updose = use more coffee.
Light roast has less solubles than dark roast. So you need more grams of coffee.
Exactly how high dose depends on the roast and what you prefer in the taste – so go explore.
When I brew a light roast filter/drip or french press – I mostly use a dosage around 60 grams pr liter – but goes from 55 up to 70 grams pr liter depending on the coffee. It’s different where they are the best. I even know people who do 85 grams pr liter.
Darker roasts are better at lower dosage. I have even heard of people using dark espresso roast as low as 35 g/liter.
3. Grinding
Grind light roasts finer than for dark roasts. I don’t know if it’s because light roasts are less porous or again this less-solubles. But you get more of the good taste by grinding finer.
Because of the denser bean structure, I use a longer bloom phase when making drip coffee (V60, Kalita): like 45 seconds instead of the typical 30 seconds.
4. Brew water
If your tap water is hard = has a lot of chalk … then it can make a light roast brew taste boring – compared with filtered water. This is a whole science in itself and quite complicated. I have started writting about it under Water.
Best advice: try out different types of water. Different filters. Different bottled water. Explore the taste.
5. In the cup
When you taste it – pay attention to how the taste change as the coffee cools in the cup. Very light coffee do not have much taste around 70ºC but get interesting around 50ºC.
6. Milk and sugar
Be cautious with the milk. Some light roasts taste great on it’s own … but if you poor milk into it: the interesting taste will all be gone. Because the flavors are so delicate.
The same with sugar. Lighter roasts can be sweeter in itself than darker roast. So taste before you ad anything.
7. Espresso
Brewing espresso of a light roast is different than with darker roasts. There are different approaches. But a few things people agree on:
Use a large basket in the portafilter, size 18 or 21 grams for 58 mm. Light roast doesn’t seem to work well in smaller pucks.
Use longer preinfusion.
Traditional in espresso you have a rule of thumb saying: reach 1:2 brew ratio in 25 seconds. So if you have 18 gram coffee → then get 36 grams in the cup. That doesn’t seem to work with light roasts: it’s sharp, sour and do not get the aroma of the given coffee.
Again bear in mind; light roast are denser and got less solubles than dark roasts. So the good taste is not as quickly released as with dark roast.
I know of two strategies to brew light roast:
– Grind finer and pull slow long shots, like 40 seconds instead of the traditional 25 seconds. Or even 1 minute shots on a Slayer espressomachine.
– Grind so it runs faster. And go for brew ratio 1:3 (thats what I do)
To explore this try letting a shot run really long while you taste with a spoon to follow what taste is extracted. At first it is always very sour and sharp. So maybe skip the first 10 seconds that comes out. But then keep tasting along untill it gets weak (=no more taste is extracted). In this way you can tell when the good taste is extracted. In a dark roast it gets weak quicker than with the light roasts. Read more under Espresso shot by taste.
Here is lots to play around with. I have had great shots of light roast espresso that ran only 18 seconds to achieve the 1:2 brew ratio. And I had a shots where good taste kept coming out even after 60 grams in the cup with 18 grams coffee in the basket.
Dudley Powel from Horsham Coffee Roaster (UK) also found that running faster shots works better with very light roasts. His recipe is: 18g in – 54g out – 26 seconds
It all also depends on your equipment. Christian Hansen (Denmark) brew light roasts espresso and he goes for brew ratio 1:2 with conical burr grinders but 1:3 for flat burr grinders. Conical burrs gives a more spread out particle distribution.
Making espresso of very dark roasted coffee seems to be best when it runs very slow and runs thick like syrup.
8. Storage
Light roasted coffee often gets better when rested a bit. For a start 4-5 days. And sometimes light roasts first peak at 3 weeks after roast date. If a coffee do not taste good in the first week – try letting it rest for some weeks.
Boris Lee once had an Ethiopian Gesha Village roast that was flavorless at first. He had given up on it but accidentally tried it after 3 months (stored in a sealed bag) – and then it was much better.
The Danish roastery La Cabra roast very light (no more than 1 minute from First Crack start). They say their espresso roast is best between 30 and 60 days.
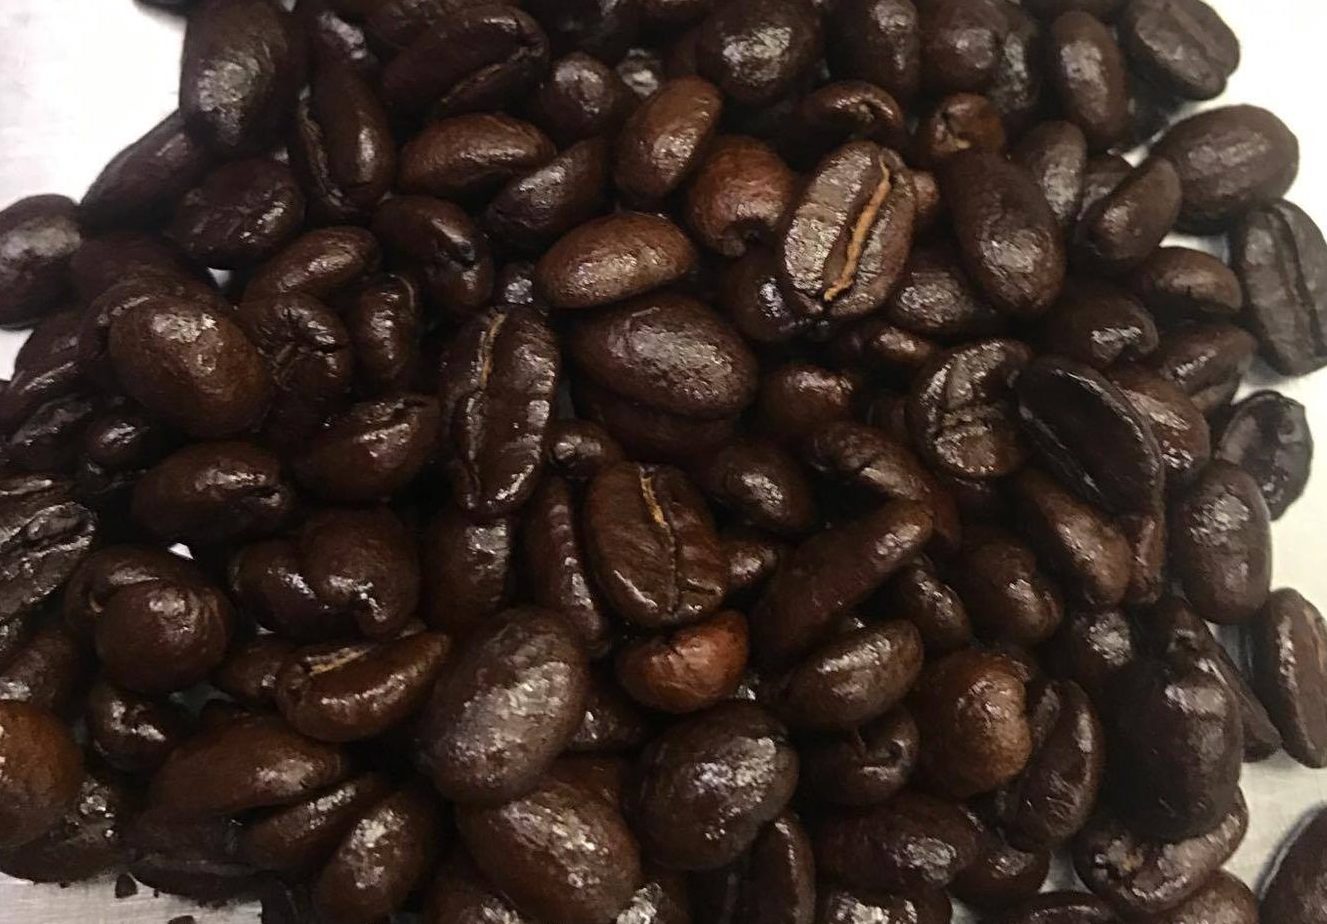
Dark roasted coffee (roasted to 2nd crack) is best between something like 2 and 10 days. Later the oils will get rancid = taste bad (well, some people don’t notice this). When you roast to Second Crack the oils will come out. If you stop at the beginning of Second Crack the oils may not be visible right away, but will appear as small wet dots on the bean surface. If you roast longer the beans will be completely covered with oils = look wet. When the oils has come out they are more degraded and exposed – and so they quicker go rancid than in lighter roasted coffee.
But as always; taste for yourself. This is just guidelines to inspire you. Here are lots to explore.
Color scale
In podcast episode 3 we measure the color of the roast on the Agtron scale.
I just participated in a blind tasting of a Colombia bean roasted to different roast degrees/ color:
95 Light – taste: acidic, sweeter, no smoke
85 Medium light- taste: acidic, sweeter, no smoke, not bitter
75 Medium dark – taste: smoke, toast
65 Dark – taste: high in smoke/tobacco, burnt, very bitter
Agtron color 95 and 85 were more alike and clearly different from 75 and 65.
A funny take on the characteristics of different roast degrees
With permission from Jon Ferguson from USA. Follow him on Twitter at ADF2050
In these podcasts episodes I explore the differences in the very expensive Geisha beans. But we also talk a lot of general things about coffee roasting.
The roastery Coffee Collective here in Copenhagen has a long experience with Geisha Coffees.
Episode 7 in the podcast Coffee Roasting Navigated is with Kaya Caretta. She is roaster at the bean importer Nordic Approach in Norway. This is only sample roasting: each batch is 100 grams and the roaster is a small Probat gas-roaster. It’s very different from roasting 120 kilos as Kaya did in her former roaster job.
Daily she roasts more than 40-60 new coffees – apart from their coffees in stock.
Episode 6 in the podcast Coffee Roasting Navigated is with four roasters at the Danish Roasting Championship. Again I ask them about how they decide to stop the roast. But we also talk development times and more.
Do you go for high acidity or more body in your roast ? How do you roast a Kenya for a light espresso ? And how do you present your beloved coffee for the customers who dont know coffee ?
Episode 4 in the podcast Coffee Roasting Navigated is with Tony Jacobsen from Norway. He own a coffee shop and roastery in Trondheim.
As in episode 2 and 3 – I interview him about how he decides to stop the roast. He goes by bean temperature.
The bean probe is quicker affected by the airflow than the beans. Metal absorb heat quicker than the cellulose beans. Think of sitting on a bench in the park on a cold day; the difference of a wood bench and a metal bench. Coffee beans are more like wood than metal.
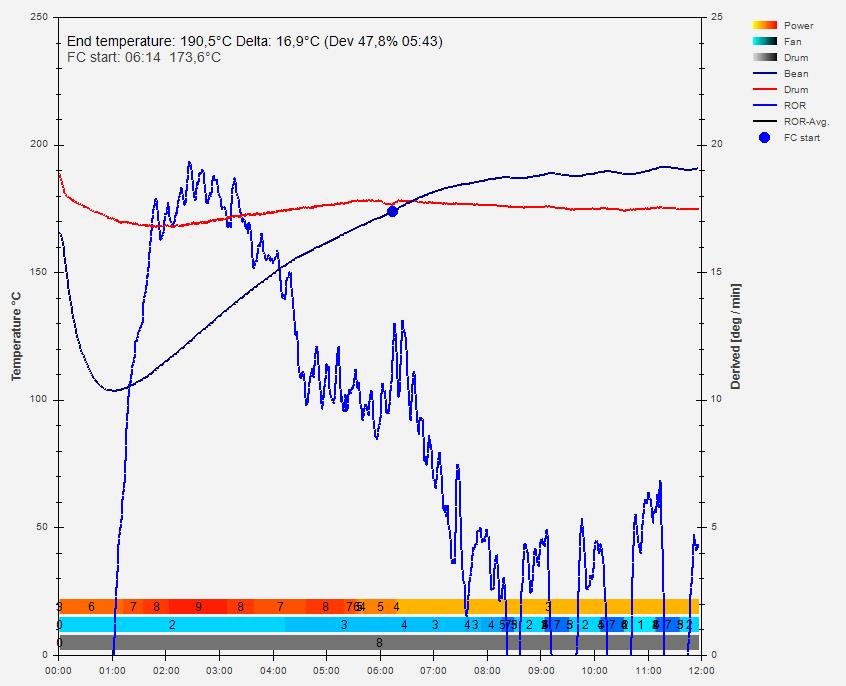
Here I have tested the bean probes sensitivity to airflow.
This test is on my Bullet R1 roaster (a test roast with old beans, not meant to taste good). The bean probe is a NTC precision type.
Look at the graph after 8 minutes:
In the last 4 minutes of the roast I jumped between a high airflow; F7 and a low; F2 (and once F1). Each time approximatly 30 seconds stretch. I chose F7 because already at F5 the airflow starts to cool rather than increase heat transfer. That is with 400 grams batches – at larger batches it takes higher fansetting.
Results
High airflow made the ROR go negative within 10 seconds.
Low airflow made it go positive within 10 seconds.
During this shifting airflow the Bean temperature (BT) did anyway rise from 187 to 191°C, measured at low airflow. Probably due to heat transfer from the drum, where the heat setting was constant at P3 during these 4 minutes.
Clearly the bean probe is not only affected by the actual bean temperature – but also of the airflow. As we long expected. And as Rob Hoos also wrote in his Roast Magazine article this month (the sep/oct 2017 issue). He also talks about it in this video https://www.youtube.com/watch?v=IQjxCHE10HQ
Note: The first 8 minutes of the roast was because I had just changed the bean probe. At first the test was only to see the difference to the old one. But during the roast I got the idea to test the airflow impact on the BT reading.
Different batch sizes
Another indication that airflow is affecting the BT probe … is that the reading at First Crack start depends on batch size.
In general it is established that First Crack (FC) starts around 200ºC. But it is very common that the bean probe on a roaster gives a lower reading. For all types of roasters.
On the Bullet R1 I have seen a range from around 170ºC up to 196ºC for FC start. This is affected by two things: if it’s an old or new probe … and on batch size.
The lower temperature happens when only roasting 400 grams. The Bullet R1 has a capacity of 1 kilo. Below you can see 2 batches Ryan Garnes did with the same bean; 700 grams and 1,000 grams.
700 grams:
1000 gram:
First crack comes higher at 1 kilo:
At 700 gram First Crack sets in at 191ºC.
At 1,000 grams it sets in at 196ºC.
In both cases airflow was around F4. The air moves from the back of the drum – through the beans – and affects the bean probe placed on the front (read about Bean probe sensitivity to airflow). When the air travels through very hot beans it gets heated up before hitting the bean probe. More hot beans will heat up the air more. Therefor higher BT reading at FC.
At yellowing point the 700 grams batch lies higher:
At 700 gram at 149ºC.
At 1,000 grams at 141ºC.
Here the beans are not as hot than at First Crack. So the beans rather cool down the air than heat it.
I have been exploring different roast profiles for Kenya beans.
Here I have used a high heat start and aimed for a really low ROR during First Crack. This is inspired by Michael de Renouards approach (see High heat post) and Tony Jacobsen (listen to podcast episode 4).
Kenya beans are typical large beans with high density. So they can tolerate high heat.
To achieve the shift from high speed in the beginning to low in the end – you have to turn the heat down well in advance of the first crack (FC).
I just roasted two batches of Kenya like this. Both roasts hit first crack around 7 minutes. Both have a Maillard phase around 3.5 minutes (from yellow to FC start).
The first one, 400 grams, has higher speed (e.g. ROR) going into FC.
DT (development time) was 48 sek and it rose 2.7ºC.
Thats an avarage ROR on 3.4 during DT.
Number 2, 500 grams, has a lower speed/ROR.
DT was 1:49 min and it rose 1.7ºC.
That gives an avg ROR at only 0.7 degrees Celcius per minute.
I was afraid ROR at 0.7 degrees pr minute was too low. But no, this was the best roast. A really elegant acidity. A nice body. Much more interesting than number 1.
Note:
I cupped them after only 2 days after roasting. Thats early in my world. But I had to ship off the 500 grams batch to a friend. So I just wanted to check if it was acceptable. Normally with Kenyans I let them rest a couple of weeks before opening.
At first you should think that the temperature was the only factor. But more factors play a role – like humidity.
And each factor may influence different parts of the roasting proces. So it’s complex. And it easily gets confusing. It also depends on the type of roaster and ventilation.
I will not claim that I got hold of all factors affecting your roasting. But here I can mention some of the factors:
Temperature
At first you should think that the temperature was the only factor. If the surroundings are colder and the air sucked into the roaster during it takes more energy to heat up your beans
Also, what temperature do your beans have before roasting ? Does your bean storage change in temperature ?
Bean storage temperature
If your beans are 25°C and you heat them up to 200°C in 8-9 minutes, that is an average of 20°C per minute. If your beans instead is only 5°C, then there is a 20°C more “road” to heat up till 200°C – so that will take an extra minute to reach.
But temperature is not the only factor – the humidity also affects the roast.
Humidity
The roaster sucks in air from the outside during the roast. Even though you are roasting indoors the humidity / H2O content in the room is significantly affected by the weather outside.
The level of humidity in the air can work in two ways:
(1) If the air is already heated humid air will transfer heat quicker than dry air. Water molecules transfer heat more efficiently than other air molecules, which are mainly Nitrogen and Oxygen.
So, if you have any airflow in your roaster: Air with higher water content will transfer heat quicker.
Have you tried being in a sauna compared with a steam bath/ Turkish Hamam ? The steam bath is about 40°C, but the sauna is like 80-90°C. That’s because the heat in humid steam bath air will hit you much more efficiently than the dry sauna air.
(2) The roaster sucks in air from the outside during the roast. If the air is not heated up before entering the roasting chamber the humidity will compete with the beans for the heat. So; dry air will make a quicker roast than humid air.
It might also be a factor that drier air gives quicker drying of the beans because it removes water quicker from the beans.
Relative and Absolute humidity
But the air on a rainy day in summer doesn’t have the same water content as a rainy day in the winter.
Lets compare a humid day at 1°C and at 25°C.
The humidity is measured with a moisture meter also called a hygrometer. But it will only give the relative humidity.
Relative humidity is the amount of moisture in the air compared to what the air can “hold” at that temperature.
As you see on the graph below; warmer air can hold more water than colder. The x-axis is the temperature in Celsius. The y-axis on the left is grams of water per cubic meters (m3). The lines are levels of relative humidity.
When outside air is sucked into the roaster we need to know the absolute amount of water per volume air.
Lets look at high humidity, 100% (rainy weather):
At 25°C the air holds 23 grams water per m3
At 1°C the air only holds 5 grams per m3
So if its 25°C outside and 100% humidity, there will be 4,5 times more water in the air sucked into the roaster – compared to 100% at 1°C.
As you can see on the graph, the difference in water content is much bigger at 25°C than around freezing point. So, in warm weather changes in humidity makes a bigger difference: At 25°C a dry day with 30% humidity has 7 grams water … compared to a humid day at 90% has 21 grams of water.
You can see this on a cold glass of water. On a warm humid day quickly water will condense on the outside of the glass. Thats because the warm air contains a lot of water. But right by the cold glass, it gets cooled down and the reach “dew point” – and condense from water vapor into fluid water.
Dry or humid climate From the graph you can also see that this has biggest impact at higher humidity. Here in Denmark we got high humidity (often above 80%). But if you live in a low humidity climate (like in the desert), look at the 10% curve on graph: the water content doesn’t change much at different temperatures.
Calculate your absolute humidity If you want to observe this in relation with your roasting – you can either have a moisture meter in the room, close together with a thermometer … Or get data from an official weather station nearby.
And then calculate the absolute humidity – like with this one http://planetcalc.com/2167/ It also takes in Barometric pressure, but it doesn’t have a big influence.
Note: If you use your own moisture meter – good calibration is needed. Moisture meters can easily be 15% wrong.
PRactical experience
How big the influence is depend on how much airflow you use. And remember the coffee beans also loose water during roasting; going from a water content of around 10% to around 2 %.
Experiencing HIGHER humidity making heating during the roasting process more efficient:
Roaster Morten Riiskjær roast 150 tons of coffee a year, both on a 12 kilo Probat roaster using gas – and on a 60 kilo automatic roaster (listen to him roasting by smell in the podcast from december 2016).
He says: “When the weather is both warm and humid – you really have to watch out because the roast quickly runs out of hand”. So he uses lower charge temperature and lower heat around First Crack.
Experiencing LOWER humidity making heating during the roasting process more efficient:
Bob Werby had been roasting a lot on his 1 kilo Bullet R1 for a year – when he changed the humidity levels in his house. Going from 60-65% rel humidity to under 50% using dehumidification Equipment.
This made the roasts quicker. With same settings and batch size he reached first crack at around 7:15 minutes at 47% humidity – compared to an average of 8:50 min to first crack with humidity levels above 60%.
A roaster told me about this impact on the roasting process:
A fan typically controls the airflow in a coffee roaster. The fan has speed settings. However, the amount of air that the fan moves does not only depend on the fan speed setting, but also depend on the backpressure from the rest of the flow path. So if you have a chaff filter or collector depleted with chaffs it gives more resistance to the fan and the airflow is lower.
And … if the outside air is denser (higher barometric pressure, higher water content) it gives more resistance to the fan and the airflow is lower.
I suppose how much the weather affects the airflow in your roaster depends on extent of airflow: If you roast with a low airflow it wont affect as much.
In general, lower water content in the air gives quicker drying … This should give a faster roast … But the question is if it has any significant importance ?
And roasters living in high altitudes say that affects the roasting too.
Somebody said that the gas burner is affected by weather conditions.
Our roasting community here in Denmark have been exploring a new approach on the Bullet R1 roaster.
15 of us were on a roasting course with Michael de Renouard from The Factory Roast Lab Copenhagen. He is a roasting consultant and travels the world teaching coffee roasting. At home in his own roastery, he is roasting on a Loring. He roast quite light.
Michael got one of our Bullet to try it out. He thought it did well; no burned or smoked taste in the beans. The roaster do well in getting the beans heated quickly. He likes the seperate control of heat and airflow.
He found that you could start out with high heat without the beans got scorched/burned. Preheat 200°C for a 700 grams batch and then P8 – leaving room to step up to P9 at then end of the ROR peak.
Note: This was for high density beans (high grown). Be aware that lower density beans, like brasil, need a lower preheat temperature. Steffen got a Costa Rica bean which gets burned if the preheat is more than 170°C.
The high heat makes a fast start on the roast. But if it doesn’t scorch the beans, then no problem. Michael also focus on the lenght of the phase from yellow until First Crack start. Here he aims for 3 minutes for this phase – and at the same time aim to bring ROR below 5 for the First Crack phase. To do this the heat must be turned down well before the start of FC.
Exploring the difference
Here Thomas Villars used the strategy on a etiopean bean. He thought it tasted better than earlier roasts of the same bean. Despite FC starts as early as 5:23 min.
New strategy:
In general a fast roast like this gives more “clarity” in the taste – and less body. Here the “middle phase” – from yellow to FC start – is 2:15 minutes long. It should give more body to prolong this phase.
Earlier Thomas roasted the same bean like this:
Update 2 months later:
Thomas has continued this new strategy. He like his coffees better now.
Comment from Therese To me this approach gives a too thin and too acidic taste. I prefer more body and sweetness.
Note: There are many approaches in coffee roasting. Don’t take this website as the only way to do it. Just take it as inspiration – and explore for your self what suits your taste.
If you made a good roast, you likely want to repeat it :-) But thats not easy to do accurately because so much influence a roast.
Steffen from KaffeRist do it often. Here he made 7 repeated roast of the same bean – trying to make the same roast profile. All done in a row.
You can see how the curves doesn’t overlay completely. And First Crack (FC) starts at different times and temperatures.
He roast on a Bullet R1 roaster. The software got a PlayBack function that repeats the settings of preheat, power and fan during from the roast you want to repeat.
But the same settings doesn’t give the same profile even though it’s the same bean and the same batch size. So during the roast Steffen overrules the automatic settings. The ROR curve is the best way to see where the Bean temperature (BT) is heading – to adjust in time.
And then he listens for the First Crack (FC) start every time. And aim to make the development from FC start the same every time: regarding time and temperature rise.
Coffee roasting is done in different ways. Some stop roast when the beans has reach a certain color.
You can hear about this in my podcast Coffee Roasting Navigated. Episode 3 is about roasting to a certain color. We are at a roasting course with Morten Münchow from CoffeeMind. I have called the episode “Roasting by color”, but Morten focuses on more than the bean color to make a good roast.
Color change during the roast – samples taken out each minute of the roast.
Roasting class with Morten Münchow (on the right) from CoffeeMind.
Color and Agtron measurements of different batches.
Here you can see that #6 is darker than #5 – which is reflected in the Agtron values: #6 was 75 and #5 was 84.
A joke about the different roast degrees 😀
With permission from Jon Ferguson from USA. Follow him on Twitter at ADF2050
Episode 8 in the podcast is about the different roast degrees.
How do you decide when to stop the roast ? Once, I asked roaster Morten Riiskjær this question. He said by smell. The smell of onion has to be over before stopping.
He has been roasting coffee for 7 years. I visited him in the roastery to try to pick up what he could smell during a roast. He also looks at the bean surface.
The onset of First Crack (FC / 1st crack) is an important control point in roasting coffee. Rapid development af the taste takes place from here onward. First crack is when the beans expand and make a noise like popcorn or the crack of a thin branch.
But all the beans do not crack right at the same time. First one single crack, then quiet, then another. But at some point, a lot is cracking. So when should you call the exact time of the start of FC ? Was it a 9:15 or 9:40 minutes ?
Another thing that makes it difficult is the background noise: the noise of the roaster and the beans hitting the drum. So it’s difficult to hear the cracks.
Try listening to this sound bite … Make your own notes before reading on:
I asked in a roaster forum to listen and say when they would say FC started (click on the picture to see a bigger size):
Around 0:15 into the sound bite, I was also shortly wondering: “is it starting now ?” But then it silenced, so no.
Then there is one clear snap around 53 seconds in. But I need more of a roll of cracks to say that it has started.
So I would also say around 1 minute.
I have made a podcast episode about listening for First Crack and counting Devellopment time from there. It is episode 5 in the podcast Coffee Roasting Navigated. Also in episode 11 we listen to different sounds of First Crack.
Some beans have a more clear FC start than others.
A late FC (like more than 13 minutes) will tend to make a weaker crack. Low density beans tend to make weaker crack.
.
When you can’t hear the cracking
How well you can hear the cracking also depends on the roasting machine. Some roasters are so insulated that it is impossible to hear.
This is what I have heard that roasters then do:
-> smell the beans in the trier. At first crack, comes a smell of vinegar.
-> look at the beans in the trier. When they crack they jump around.
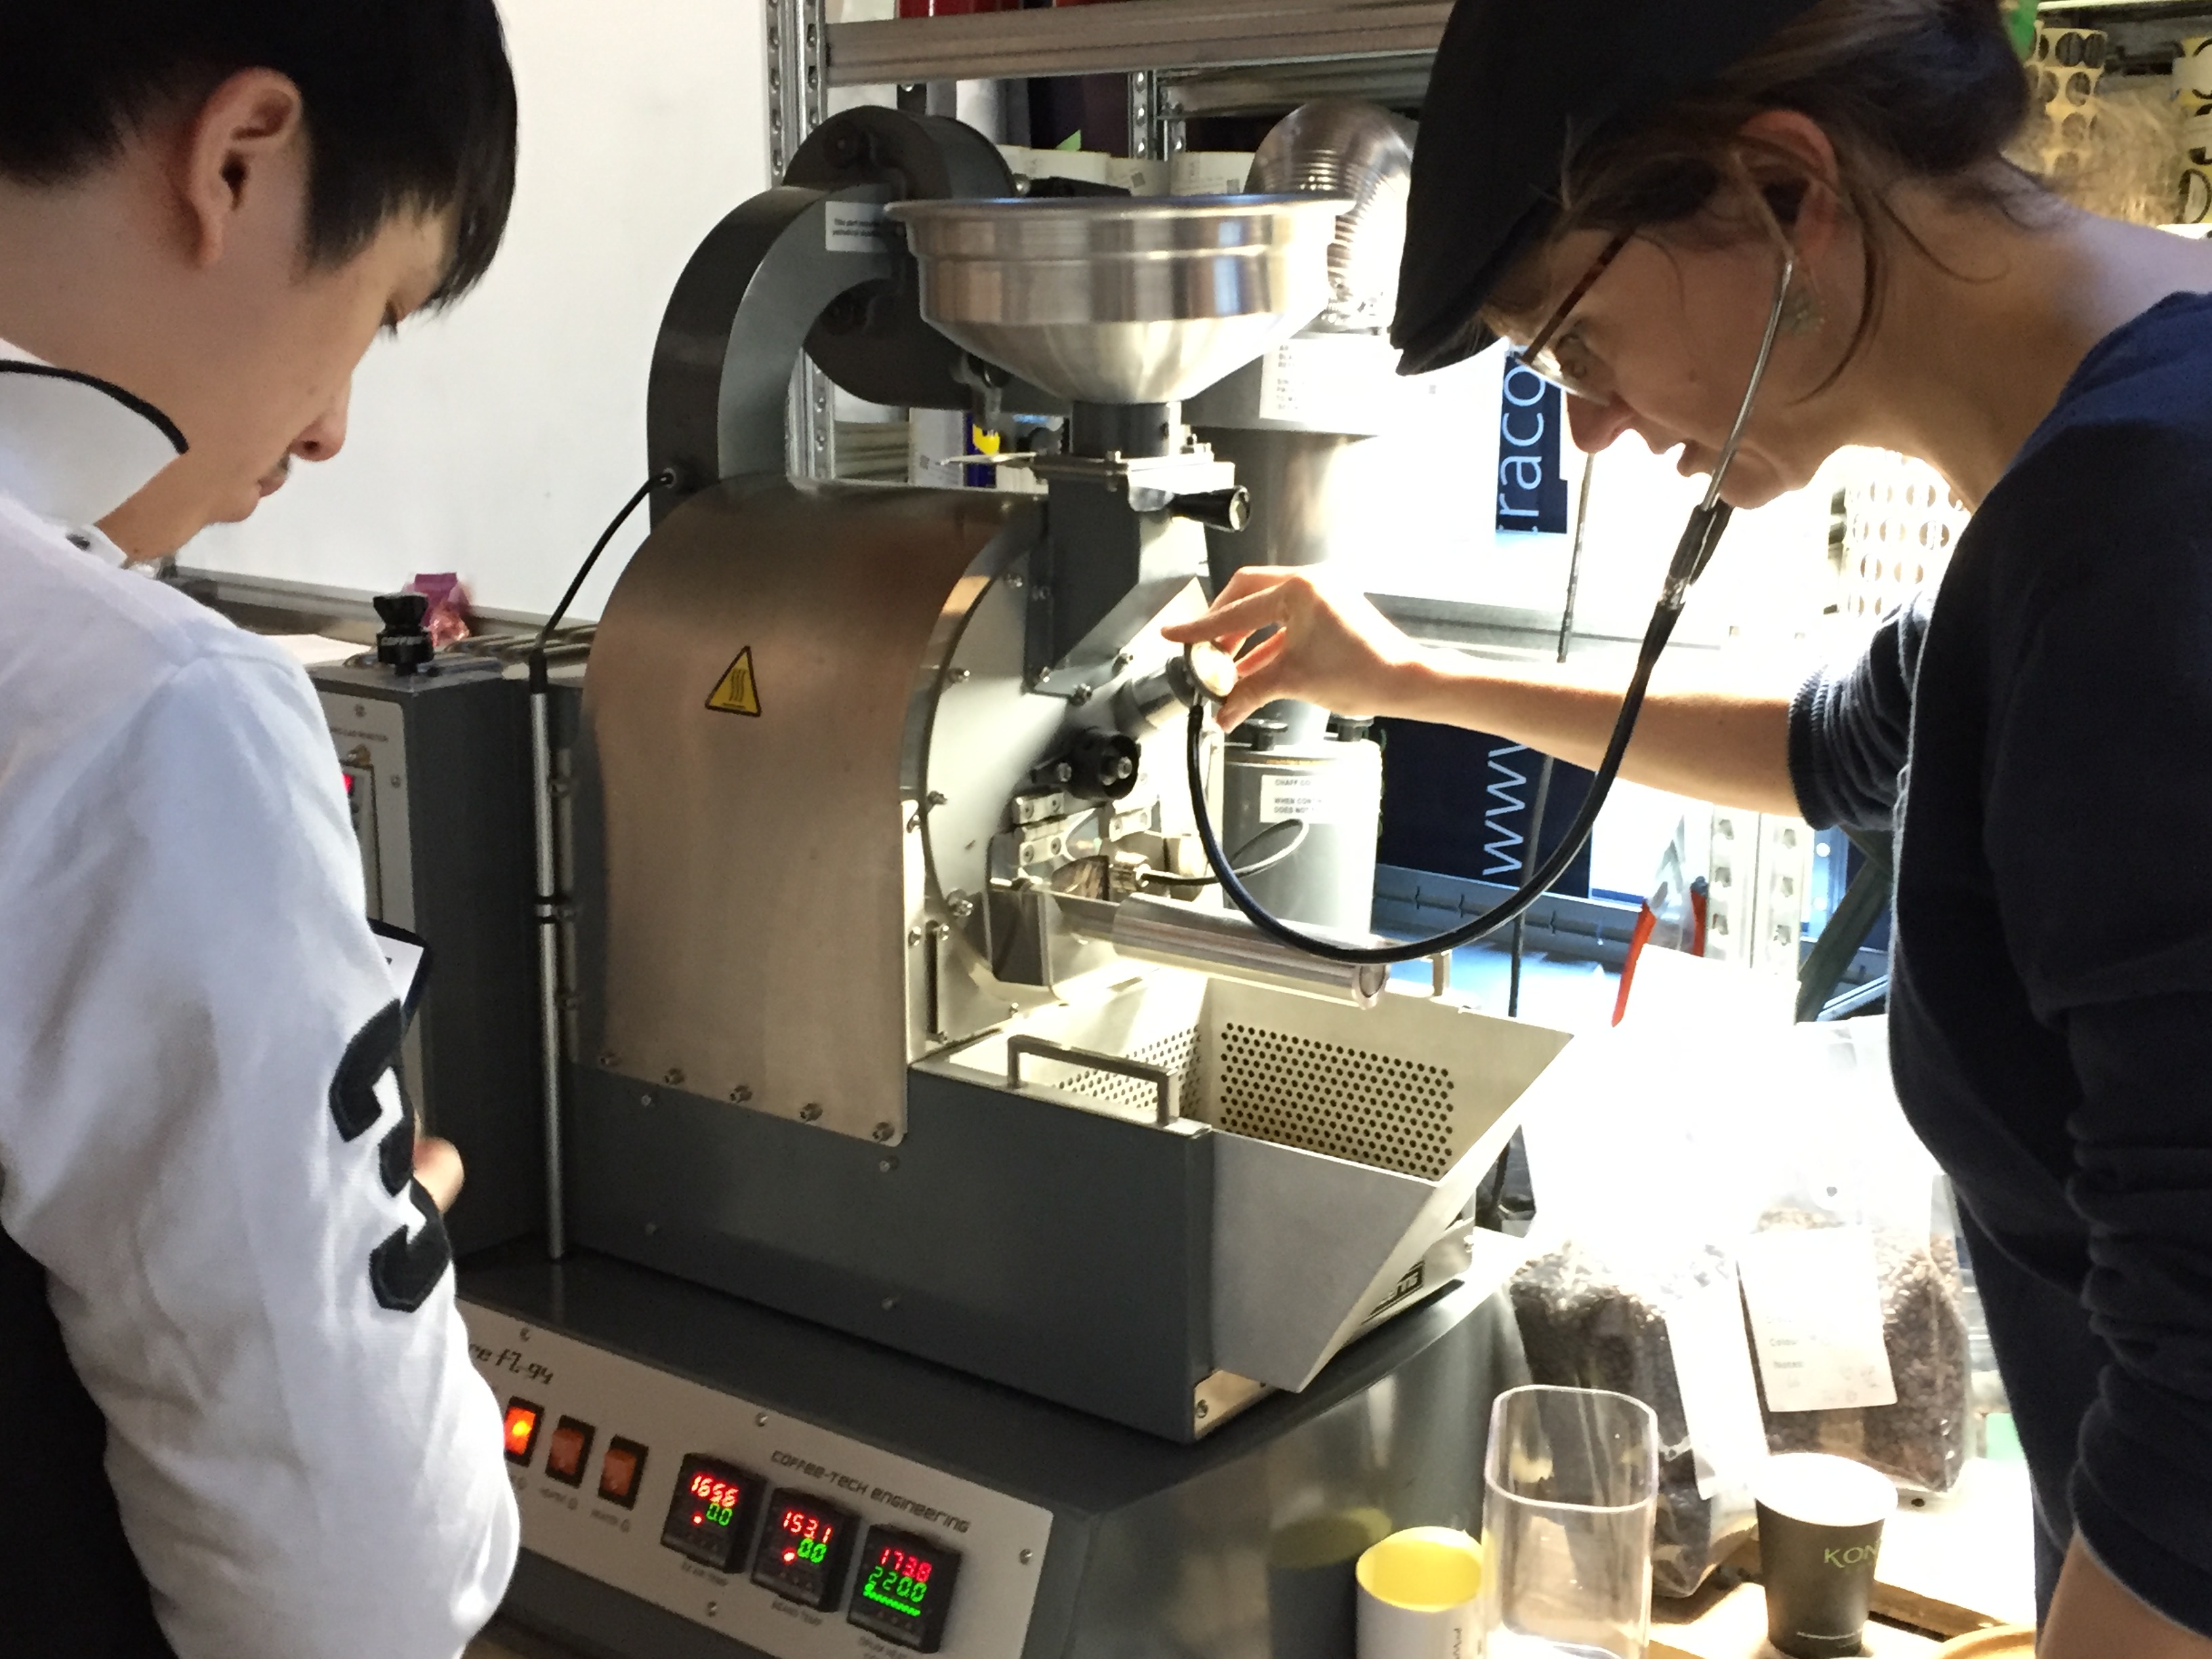
Listening devices
You can also use some listening device to get the sound. On this photo I listen with a stethoscope. It only really works through air – and not on metal or glass window (because that will transmit all the other noises as well) . On this roaster I took out the trier and fitted the stethoscope on.
Photo by Morten Münchow, CoffeeMind.
Here is another device: earmuffs with a tube. This photo is from the roastery Holy Bean in Denmark. Bo Nielsen got them from CoffeeTools.
Sound analysis
Research has been done on the sounds during coffee roasting by P.S. Wilson. In his article “Coffee roasting acoustics”, he concludes:
> Near the end of the roasting process, sounds known as first crack exhibit a higher acoustic amplitude than sounds emitted later, known as second crack. First crack emits more low frequency energy than second crack.
 Ida and the 65-year old Probat roaster